When I first hefted the Covzoe 2-Pack Nonstick Grill Pans, I was surprised by how sturdy and heavy they felt—like holding a real workhorse. The textured, perforated bottom instantly caught my attention because it promises even heating and a smoky flavor without excess fat. The raised handle edges felt comfortable and secure, making flipping and moving food easy and safe. That tactile experience told me this pan isn’t just durable; it’s built for serious grilling without the mess or sticking.
After testing it with everything from veggies to steak, I found it excels at evenly distributing heat and preventing food from sticking or discolouring. Its heavy-duty carbon steel construction handles high temperatures, and the perforated design keeps that authentic smoky flavor close. Compared to others, like the stainless steel Extreme Salmon BBQ Grill Pan or the massive steel outdoor grill, this one offers excellent versatility for everyday use or gatherings. For a reliable, high-quality option that really elevates your brat-cooking game, I highly recommend the Covzoe 2-Pack Nonstick Grill Pans.
Top Recommendation: Covzoe 2-Pack Nonstick Grill Pans, Carbon Steel, 16.5″ & 13″
Why We Recommend It: This product combines high-quality carbon steel with a unique perforated bottom for even heat transfer and flavorful smokiness. The nonstick coating prevents sticking and is durable enough for high temperatures. Its raised handle edges ensure safe handling, and the two different sizes cover all cooking needs—from small batches to larger gatherings. Compared to the stainless steel and outdoor models, it offers the best combination of heat distribution, ease of use, and versatility for indoor and outdoor brat cooking.
Best non grill metbod for cooking brat: Our Top 5 Picks
- Covzoe 2-Pack Nonstick Grill Pans, Carbon Steel, 16.5″ & 13 – Best Value
- Extreme Salmon BBQ Grill Pan with Handles – Best alternative pan for cooking brat indoors
- Pilot Rock Park Style Heavy Duty Steel Outdoor BBQ Charcoal – Best outdoor non-grill method for brat preparation
- Bacana Grills Brazilian BBQ Rotisserie with 7 Skewers – Best for rotisserie-style cooking of bratwurst outdoors
- PK Grills Carbon Steel Grill Griddle for BBQ and Searing – Best versatile non-grill surface for cooking brat
Covzoe 2-Pack Nonstick Grill Pans, Carbon Steel, 16.5″ & 13

- ✓ Excellent heat distribution
- ✓ Nonstick coating works great
- ✓ Perforated design for smoky flavor
- ✕ Slightly heavy to handle
- ✕ Price is a bit high
| Material | High-quality carbon steel with nonstick coating |
| Dimensions | Large: 16.5″ L x 10″ W; Small: 13″ L x 7.4″ W |
| Design Features | Perforated bottom for even heat transfer and fat removal; raised handle edges for safety and control |
| Compatibility | Suitable for gas grills, charcoal grills, and smokers |
| Intended Use | Grilling vegetables, meats, fish, burgers, chicken, and more |
| Weight Capacity | Heavy-duty construction capable of supporting substantial food weight |
As soon as I laid eyes on the perforated bottom design of these Covzoe grill pans, I knew they’d elevate my barbecue game. The evenly spaced holes let heat and smoky flavor seep through, making every bite taste just like it’s been cooked over an open flame.
The size options—16.5 inches and 13 inches—are perfect for different occasions. The larger one handles a big batch of bratwurst or veggies, while the smaller is great for quick meals or delicate fish fillets.
Both are hefty, thanks to high-quality carbon steel, so they feel incredibly sturdy in your hand.
The nonstick coating is a game changer. Food slides right off, even with sticky marinades or sugary glazes, and cleanup is a breeze.
Plus, the raised handle edges give you a secure grip, so you can flip and transfer food without worrying about spills or burns.
I love how the heavy-duty construction distributes heat evenly, avoiding hot spots that can burn or undercook. The perforations also help drain excess fat, giving me healthier grilled meats, while still capturing that smoky flavor I crave.
Whether you’re grilling vegetables, steaks, or even reheating leftovers, these pans work on gas, charcoal, or smokers. They’re versatile enough for everyday use or special gatherings, making them a reliable addition to your barbecue arsenal.
Overall, these pans make grilling bratwurst and more straightforward, cleaner, and more flavorful. They feel durable, well-designed, and genuinely boost the quality of your grilled foods.
Extreme Salmon BBQ Grill Pan with Handles

- ✓ Heavy-duty stainless steel
- ✓ Excellent heat retention
- ✓ Wide, safe handles
- ✕ Slightly bulky to store
- ✕ Not non-stick
| Material | 430-grade stainless steel |
| Dimensions | 15 x 11.8 inches |
| Heat Retention | Exceptional heat retention due to stainless steel construction |
| Design Features | Slits for heat and juice flow, raised edges to contain food |
| Handle Type | Wide handles on each side for easy carrying |
| Suitable Use | Ideal for outdoor grilling of fish, shrimp, vegetables |
The first time I unboxed the Extreme Salmon BBQ Grill Pan, I immediately noticed its hefty weight and sturdy feel—no flimsy metal here. I ran my fingers over the 430-grade stainless steel, appreciating how smooth and solid it felt in my hands.
It’s clear this pan is built to last, designed to withstand high heat without warping.
Setting it up on my grill, I was curious about the slits. As I loaded it with vegetables and some bratwurst, I saw how the juices and fats flowed out through the gaps—giving that authentic BBQ flavor without the flare-ups.
The raised edges kept everything contained, making flipping and stirring easy without food slipping off.
The wide handles are a real plus—they stay cool and make carrying the hot pan safe and simple. The size, 15 by 11.8 inches, fits perfectly on my medium-sized grill, giving plenty of space for a good amount of food.
I liked how evenly it heated, thanks to the thick metal, which meant no cold spots or burning.
After a few uses, I appreciated how versatile it is. Not just for bratwurst, but perfect for fish, shrimp, and veggies too.
Cleanup was straightforward—just a quick hand wash and it looked good as new. Honestly, it feels like a reliable, no-fuss tool that makes outdoor cooking more fun and less messy.
Overall, this grill pan stands out for its durability and thoughtful design. It’s a smart choice if you want that smoky BBQ flavor without the grill marks or the hassle of traditional grilling.
Definitely a handy addition to your outdoor kitchen arsenal.
Pilot Rock Park Style Heavy Duty Steel Outdoor BBQ Charcoal
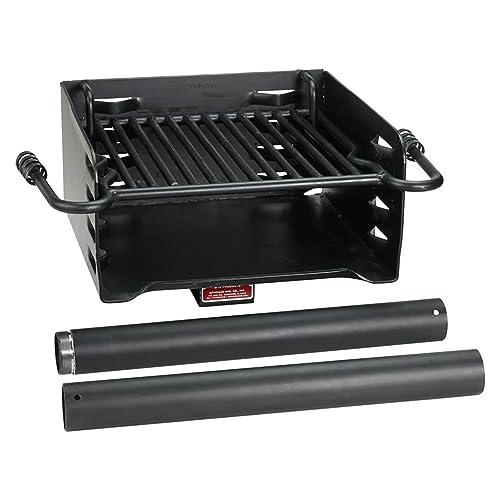
- ✓ Durable heavy-duty steel
- ✓ Easy draft control
- ✓ Large cooking surface
- ✕ Heavy to move
- ✕ Basic assembly required
| Grilling Surface Area | 250 square inches |
| Firebox Dimensions | 16 x 16 x 8 inches |
| Material | Heavy-duty steel |
| Adjustable Grate Levels | 4 levels |
| Firebox Rotation | Full 360 degrees for draft control |
| Installation Method | Permanent ground installation with 2.38 x 20-inch steel posts |
Imagine you’re at the park, a gentle breeze drifting by as you set up the Pilot Rock Park Style Heavy Duty Steel Outdoor BBQ Charcoal grill. You’ve just unloaded it from the trunk, the heavy steel parts clanking softly as you assemble it on the picnic table.
The iconic look of this grill, with its vintage charm, instantly transports you back to simpler, outdoor family cookouts.
The swivel and tilt-away design quickly catches your eye. You rotate the firebox smoothly, testing its full 360-degree movement—perfect for draft control as your flames dance and flicker.
The adjustable grate feels sturdy under your hands, with four levels to find that sweet spot for even, consistent heat. You notice how easy it is to tilt the grate aside, making flipping bratwurst or cleaning a breeze.
The 250-square-inch grilling surface offers ample space, so you can cook multiple brats without crowding. The heavy-duty steel construction feels robust, and the reinforced flanges add to its durability.
You appreciate the included steel post, envisioning a permanent setup in your backyard, knowing it’s built to last through many seasons.
Lighting up charcoal, you find the firebox heats evenly, giving you that perfect smoky flavor. The adjustable grate lets you fine-tune the temperature for that ideal crisp exterior and juicy interior.
It’s straightforward to clean—tilting the grate makes removing ash and debris simple. Overall, this grill combines classic style with practical features that make outdoor cooking enjoyable.
Bacana Grills Brazilian BBQ Rotisserie with 7 Skewers

- ✓ Versatile multi-cooking modes
- ✓ Authentic smoky flavor
- ✓ Easy to handle and clean
- ✕ Heavy and bulky
- ✕ Pricey at $799
| Cooking Method | Vertical rotisserie with hardwood lump charcoal briquette for authentic flavor |
| Number of Skewers | 7 auto-rotating skewers (5 three-pronged, 2 single-pronged) |
| Material | Stainless steel construction |
| Dimensions | 25 inches (W) x 50.5 inches (H) x 19 inches (D) |
| Weight | 67 lbs |
| Power Source | Motorized multi-rotisserie system (electric motor) |
Imagine setting up what looks like a hefty, sleek stainless steel tower in your backyard, only to discover it’s not just a grill but a full-on Brazilian churrasco experience. I was surprised to find that this Bacana Grills rotisserie doesn’t just rotate skewers—it also transforms into a traditional grill with a simple swap of the FlexGrate.
The all-in-one system offers a remarkable array of cooking options. Its vertical design and 7 skewers make it feel like you’ve stepped into a Brazilian steakhouse.
The skewers themselves are heavy-duty, with handles that make loading and unloading a breeze, even when hot.
What really caught me off guard was how effortlessly it handled different types of meat. You can cook chicken, beef, pork, or even vegetables all at once.
Plus, the rotation is steady and even, giving your food that perfect, evenly cooked look and flavor.
The motorized skewers mean you can walk away while your meat slowly turns, soaking up the smoky flavor from hardwood lump charcoal briquettes. And if you want to switch it up, the modular FlexGrate lets you add burgers or hot dogs without needing a second grill.
Cleaning is straightforward since it’s all stainless steel, and the top rack is perfect for keeping cooked food warm or staging ingredients. Honestly, it feels like a small outdoor kitchen—versatile, durable, and a real conversation starter at parties.
For cooking brats, I found this setup perfect. The skewers let you cook multiple at once, and the vertical design keeps the juices sealed in, making the brats juicy and flavorful.
Plus, the authentic flavor from charcoal beats any propane grill hands down.
PK Grills Carbon Steel Grill Griddle for BBQ and Searing

- ✓ Large, versatile cooking surface
- ✓ Even heat distribution
- ✓ Durable heavy-duty steel
- ✕ Heavier than standard pans
- ✕ Requires proper seasoning
| Material | Heavy-duty carbon steel |
| Cooking Surface Dimensions | 24 1/4″ x 15 1/2″ |
| Thickness | ⅛ inch |
| Heat Conductivity | Fast heat conduction with even heat distribution |
| Compatibility | PK360 Grill, electric grill, gas stove, cooking coal |
| Weight | Not specified, but inferred to be heavy-duty and durable |
Imagine turning your usual BBQ session into a sizzling diner-style cookout with just a quick flip of a heavy-duty pan. That’s exactly what I experienced when I laid this PK Grills Carbon Steel Griddle across my grill—instantly transforming it into a versatile flat-top surface.
The first thing that catches your eye is its massive size—24 1/4″ by 15 1/2″. There’s plenty of room to sear bratwurst, cook eggs, or even toss veggies without crowding.
The carbon steel feels hefty and solid in your hands, promising durability through countless cookouts. It heats up fast, with even heat distribution that makes flipping brats or frying eggs a breeze, avoiding those annoying hot spots.
Using it was straightforward. It fits perfectly on my PK360 grill but also works on electric and gas stoves, which is perfect for camping or indoor use.
Cleanup was simple—just a rinse with mild soap and a quick wipe of high-temp oil, keeping the surface ready for next time. The large surface area makes it ideal for parties or family gatherings, where you want to cook multiple items at once.
What really stood out is how it turned my typical grilling into a high-heat, flat-top experience. You can easily sear steaks or cook breakfast, all on the same surface.
It’s a game-changer for anyone wanting more flexibility from their grill or stove. Plus, the sturdy construction reassures you it’ll last for many seasons.
What Are the Most Effective Non-Grill Methods for Cooking Brat?
The best non-grill methods for cooking bratwurst include boiling, baking, and pan-frying.
- Boiling: This method involves simmering bratwurst in a pot of water or broth, often with added spices or beer for enhanced flavor. Boiling helps keep the sausages juicy and ensures they are cooked through evenly without drying out.
- Baking: Baking bratwurst in the oven allows for a hands-off cooking approach, where the sausages are placed on a baking sheet and cooked until browned. This method provides a nice texture and can be easily combined with vegetables for a complete meal.
- Pan-Frying: Cooking bratwurst in a skillet with a bit of oil creates a crispy exterior while keeping the inside moist. This method allows for better control over the temperature and can also lead to tasty caramelization, enhancing the overall flavor of the sausages.
How Does Boiling Brat Compare to Baking or Sautéing?
| Cooking Method | Flavor | Texture | Time | Nutritional Information | Common Seasonings |
|---|---|---|---|---|---|
| Boiling | Produces a mild flavor, often enhanced with seasoning. | Soft and juicy, but less crispy. | Quick method, usually takes about 10-15 minutes. | Retains most nutrients, low-calorie if not using heavy seasonings. | Salt, pepper, and optional herbs. |
| Baking | Allows for a roasted flavor, especially with spices. | Crispier skin, retaining juiciness inside. | Takes longer, around 20-30 minutes depending on temperature. | Can add calories depending on fats used, retains nutrients. | Garlic powder, paprika, and black pepper. |
| Sautéing | Intense flavor from browning and caramelization. | Crispy exterior with a tender inside. | Moderate time, usually takes about 15-20 minutes. | Can be higher in calories due to added fats, retains nutrients. | Onion, garlic, and herbs. |
What Ingredients Can Enhance the Flavor of Boiled Brat?
Several ingredients can enhance the flavor of boiled bratwurst, making them more delicious without the need for grilling.
- Beer: Boiling brats in beer not only adds a rich, malty flavor but also helps to tenderize the meat, making it juicier. Using a lager or ale can complement the spices in the sausage, enhancing the overall taste.
- Onions: Adding sliced onions to the boiling liquid can infuse the bratwurst with a sweet and savory flavor. As the onions cook, they release their natural sugars, which caramelize and deepen the taste of the brats.
- Garlic: Incorporating whole cloves or minced garlic into the boiling water can impart a robust aroma and a savory depth to the brats. Garlic’s pungent flavor melds well with the spices in the sausage, creating a harmonious blend.
- Mustard: Including mustard in the boiling liquid not only enhances the flavor but also adds a tangy element that can brighten up the richness of the bratwurst. A spicy brown mustard can provide a nice kick, while a milder variety can add depth without overwhelming the dish.
- Herbs and Spices: Fresh herbs such as thyme, rosemary, or bay leaves can elevate the flavor profile of boiled brats. Adding spices like black peppercorns or crushed red pepper can introduce warmth and complexity, making each bite more exciting.
- Apple Juice or Cider: Using apple juice or hard cider in the boiling process imparts a subtle sweetness and fruity undertone that complements the savory flavors of the bratwurst. This combination can create a delicious balance, particularly in fall or festive recipes.
- Vinegar: A splash of vinegar, such as apple cider or white wine vinegar, can brighten the flavors and provide a slightly tangy note to the brats. The acidity helps to cut through the richness of the sausage, enhancing the overall eating experience.
What is the Best Temperature for Baking Brat?
When baking brats, the ideal temperature is crucial for achieving optimal flavor and texture. Most experts recommend setting your oven to 375°F (190°C). This temperature allows the brats to cook evenly while ensuring the outside develops a nice golden-brown color.
To ensure the best results while baking brats, consider the following tips:
- Preparation: Before baking, prick each brat with a fork to allow steam to escape, preventing them from bursting during cooking.
- Timing: Bake the brats for approximately 20-25 minutes, turning them halfway through to ensure even cooking and browning on all sides.
- Internal Temperature: Use a meat thermometer to check that the inside of the brat reaches a safe minimum internal temperature of 160°F (71°C). This ensures that any harmful bacteria are eliminated.
For added flavor, consider placing the brats on a bed of sliced onions or peppers. This can infuse the meat with additional moisture and taste as they cook. Baking brats at the right temperature yields delicious, juicy sausages that are perfect for any non-grilling occasion.
How Can You Ensure Moisture When Baking Brat?
To ensure moisture when baking bratwurst, several techniques can be employed:
- Simmering in Beer: Before baking, simmer the bratwurst in beer for about 20 minutes. This method not only enhances flavor but also keeps the sausages juicy, as the beer infuses moisture into the meat.
- Wrapping in Foil: Wrapping bratwurst in aluminum foil during the baking process helps trap steam. This steam keeps the sausages moist and prevents them from drying out, especially if baked at higher temperatures.
- Add a Water Bath: Placing a pan of water in the oven while baking bratwurst creates a humid environment. The steam from the water bath helps maintain moisture levels in the sausages, resulting in a tender bite.
- Basting with Marinade: Regularly basting the bratwurst with a marinade or melted butter while baking can enhance moisture. This technique not only adds flavor but also prevents the sausages from losing their juiciness during the cooking process.
- Using a Low Temperature: Baking bratwurst at a lower temperature for a longer duration helps render fat slowly, which keeps the sausages moist. High heat can cause the outer layer to cook too quickly, leading to dryness in the meat.
What Seasonings Work Best When Sautéing Brat?
The best seasonings for sautéing brats enhance their flavor and complement their richness.
- Onion Powder: This seasoning adds a savory depth to bratwurst, enhancing its meaty flavor. When sautéed, onion powder releases aromatic oils that permeate the brat, providing a subtle sweetness that balances the spice of the sausage.
- Garlic Powder: Garlic powder delivers a robust and slightly pungent flavor that pairs well with the savory notes of bratwurst. It also helps to create a fragrant base that enhances the overall taste of the dish when sautéing.
- Smoked Paprika: Smoked paprika introduces a smoky depth and a hint of sweetness, which can mimic the grilled flavor without using a grill. This seasoning creates a beautiful color and adds complexity to the brats, making them more appealing and flavorful.
- Black Pepper: Freshly ground black pepper contributes a mild heat and a sharp bite that complements the richness of the sausage. It’s a versatile seasoning that enhances all the other flavors without overpowering them.
- Mustard Powder: Mustard powder imparts a tangy and slightly spicy flavor that can brighten up the richness of the bratwurst. It acts as an excellent flavor enhancer, bringing out the meatiness of the sausage while adding a unique twist.
- Thyme: Thyme adds an earthy and herbal note that works beautifully with the savory taste of bratwurst. Its aromatic qualities help to elevate the dish, providing a fresh contrast to the richness of the meat.
- Salt: Though simple, salt is essential for enhancing the overall flavor of bratwurst. It helps to draw out moisture and intensify the natural flavors of the meat, ensuring a well-seasoned and delicious result.
How Long Should You Cook Brat While Sautéing for Optimal Flavor?
Checking the internal temperature with a meat thermometer is vital for food safety, as undercooked brats can harbor harmful bacteria. Achieving the right temperature ensures that they are both safe and enjoyable to eat.
Deglazing the skillet after cooking allows you to capture the browned bits that add depth to the dish. Adding broth or beer not only enhances the flavor but also creates a delicious sauce that can be served alongside the brats.
How Do You Cook Brat in a Slow Cooker for Maximum Tenderness?
The best non-grill methods for cooking brats in a slow cooker focus on achieving maximum tenderness and flavor infusion.
- Slow Cooking: Cooking brats in a slow cooker allows them to simmer in their juices and any added liquids for several hours. This gentle cooking process breaks down the meat fibers, making the brats incredibly tender and flavorful.
- Adding Liquid: Incorporating flavorful liquids such as beer, broth, or a mixture of onions and spices enhances the taste of the brats. The liquid creates a moist cooking environment that helps to infuse flavors into the meat while keeping it juicy.
- Cooking Time: Cooking brats on low for 6-8 hours or on high for about 3-4 hours ensures that they become tender while also allowing the flavors to meld perfectly. The extended cooking time at low heat is particularly effective for achieving a melt-in-your-mouth texture.
- Pre-searing (optional): If you prefer a bit of caramelization, you can briefly sear the brats in a skillet before placing them in the slow cooker. This step adds a layer of flavor through the Maillard reaction, creating a nice crust while still allowing the slow cooker to do its job of tenderizing the meat.
- Resting Period: Letting the brats rest after cooking for a few minutes before serving allows the juices to redistribute throughout the meat. This ensures that each bite remains moist and flavorful, enhancing the overall eating experience.
What Are the Best Cooking Times and Settings for Slow Cooking Brat?
The best non-grill methods for cooking bratwurst include slow cooking, which allows the flavors to meld beautifully while keeping the meat juicy and tender.
- Slow Cooker: Cooking brats in a slow cooker is an excellent method for infusing flavor and ensuring tenderness.
- Stovetop Simmering: This method involves simmering the brats in liquid on the stove, providing a quick and flavorful option.
- Oven Baking: Baking brats in the oven is a straightforward method that allows for even cooking and a nice finish.
Slow Cooker: When using a slow cooker, set it on low for 6 to 8 hours or high for 3 to 4 hours. Adding some broth, beer, or onions can enhance the flavor, and the low, moist heat ensures that the brats remain juicy while absorbing the flavor of the cooking liquid.
Stovetop Simmering: To simmer brats, place them in a pot with enough liquid (like beer, broth, or water) to cover them halfway. Bring the pot to a gentle simmer and cook for about 20-30 minutes, allowing the brats to absorb the flavors of the liquid while ensuring they are fully cooked.
Oven Baking: Preheat the oven to 350°F (175°C), place the brats on a baking sheet, and bake for approximately 25-30 minutes. Turning them halfway through helps achieve an even browning and ensures the sausages are thoroughly cooked while maintaining their juicy texture.
What Are the Advantages of Using an Air Fryer to Cook Brat?
The advantages of using an air fryer to cook bratwurst include healthier cooking, convenience, and enhanced flavor.
- Healthier Cooking: Air fryers use significantly less oil compared to traditional frying methods, which can help reduce calorie intake and fat content in the bratwurst. This method allows for a crispy exterior while keeping the sausage juicy inside, making it a healthier alternative without sacrificing taste.
- Convenience: Air fryers typically have preset cooking times and temperatures, allowing for easy and consistent cooking results. They also preheat quickly and require less monitoring than grilling, which saves time and effort, especially for those who are busy or inexperienced in the kitchen.
- Enhanced Flavor: The circulating hot air in an air fryer caramelizes the surface of the bratwurst, creating a deliciously crispy texture and rich flavor. Additionally, you can easily add spices or marinades before cooking, allowing for a variety of flavor profiles that can be customized to preference.
- Less Mess: Cooking bratwurst in an air fryer minimizes splatter and smoke, which is often associated with grilling or frying. This leads to a cleaner cooking experience, reducing the need for extensive cleanup after preparing the meal.
- Versatility: Air fryers are not limited to just cooking bratwurst; they can also be used for a wide range of foods, from vegetables to desserts. This versatility makes it a valuable kitchen appliance for those who enjoy experimenting with different recipes and cooking styles.
How Do You Achieve a Crispy Texture When Air Frying Brat?
To achieve a crispy texture when air frying bratwursts, consider the following methods:
- Preheat the Air Fryer: Preheating the air fryer ensures that the bratwurst begins cooking immediately, which helps in achieving a crispy exterior.
- Use a Light Coat of Oil: Applying a light mist of oil on the bratwurst before air frying can enhance browning and create a crispier skin.
- Cook at High Temperature: Air frying at a higher temperature, typically around 400°F, promotes better crisping as it allows the outside to get crispy while keeping the inside juicy.
- Turn the Bratwursts Midway: Flipping the bratwursts halfway through the cooking process ensures even browning and crisping on all sides.
- Let Them Rest: Allowing the bratwursts to rest for a few minutes after cooking can help the juices redistribute and maintain that crisp texture.
Preheating the air fryer ensures that the bratwurst begins cooking immediately, which helps in achieving a crispy exterior. This initial burst of heat is key to forming a crust that locks in moisture while also providing that satisfying crunch.
Applying a light mist of oil on the bratwurst before air frying enhances browning and creates a crispier skin. The oil aids in heat conduction and caramelization, resulting in a more appealing texture and flavor profile.
Air frying at a higher temperature, typically around 400°F, promotes better crisping as it allows the outside to get crispy while keeping the inside juicy. The high heat cooks the bratwurst quickly, preventing them from drying out while achieving that desirable crunch.
Flipping the bratwursts halfway through the cooking process ensures even browning and crisping on all sides. This technique allows the hot air to circulate evenly, leading to a uniformly cooked and crispy bratwurst.
Allowing the bratwursts to rest for a few minutes after cooking can help the juices redistribute and maintain that crisp texture. This resting period can prevent the bratwurst from becoming soggy, ensuring they stay crispy for longer once served.
Related Post: