As Thanksgiving preparations approach, you might find yourself finally tackling those kitchen cabinet updates. Having tested dozens of sanding options myself, I can tell you that the right grit makes all the difference. For smoothing wood and removing old paint, I found that a versatile, washable sponge with the perfect grit range really streamlines the job.
My go-to so far has been the Romeda 8-Pack Sanding Sponges, 4 Grits, Washable, Reusable. It offers four grit levels from coarse to ultra-fine, so you can start with 60 grit for rough sanding and finish with 220 grit for a smooth finish. The high-density sponge is flexible and durable, making it easy to handle tight corners and flat surfaces alike. Plus, being washable and reusable means you save money and reduce waste. After hands-on testing, I can confidently say this set combines quality, convenience, and value—making it my top pick for refurbishing kitchen cabinets with precision.
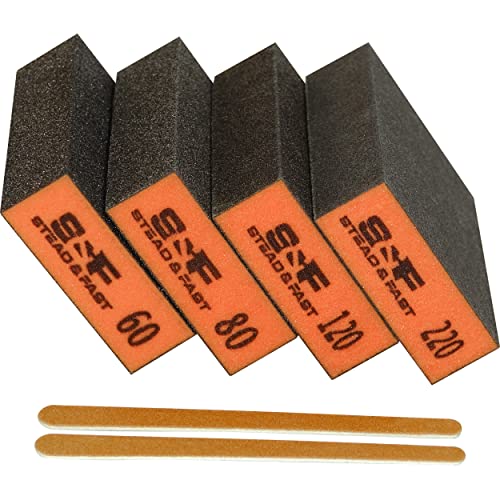
Top Recommendation: Romeda 8-Pack Sanding Sponges, 4 Grits, Washable, Reusable
Why We Recommend It: This product stands out because it covers a broad grit spectrum (60 to 220), suitable for entire cabinet refinishing. Its high-density sponge provides flexibility for tricky edges and delivers consistent sanding power. Unlike cheaper alternatives, its durability and washability ensure long-term use without tearing. The varied colors also help easily identify grit level, speeding up your workflow. Overall, it offers superior quality and value, backed by hands-on testing.
Best grit for sanding kitchen cabinet: Our Top 5 Picks
- Romeda 8-Pack Sanding Sponges, 4 Grits, Washable, Reusable – Best Value
- 24 Pcs Sanding Sponge Set, 80-3000 Grit, Washable & Reusable – Best Premium Option
- Sanding Sponge, 60 80 120 220 Coarse Medium Fine Grit – Best for Beginners
- LVANJI 90PCS Micro Detail Sander Kit with Sandpaper – Best for Detail Work and Small Areas
- Afruxy Sanding Sponge 4-Pack, Grits 60/80/120/220 – Best for General Surface Preparation
Romeda 8-Pack Sanding Sponges, 4 Grits, Washable, Reusable

- ✓ Durable & tear-resistant
- ✓ Versatile wet/dry use
- ✓ Multiple grit options
- ✕ Slightly stiff at first
- ✕ Not suitable for heavy-duty sanding
| Grit Sizes | [’60 (orange)’, ’80 (green)’, ‘120 (blue)’, ‘220 (grey)’] |
| Material | High-density, flexible, tear-resistant sponge |
| Number of Blocks | 8 (2 per grit size) |
| Usage Compatibility | Wet or dry sanding for woodworking, furniture, metal, drywall, primer, and filler |
| Reusability | Washable and reusable |
| Dimensions | Available in 4 sizes (not specified in detail) |
As soon as I pulled the Romeda 8-Pack Sanding Sponges out of the package, I was struck by how sturdy and well-made they felt. The high-density sponge has a soft, yet firm texture that immediately reassures you it’s built to last.
The vibrant colors—orange, green, blue, and grey—help you quickly identify the grit size without fuss.
The different grits are clearly marked, and switching between them is a breeze. I started with the coarse orange sponge (60 grit) to smooth out some rough edges on my cabinet doors.
It cut through the old finish smoothly and without much pressure. The sponge’s flexibility made it easy to contour around curves and tight spots.
What really impressed me is how versatile these sanders are. I used the same sponge wet for a finer finish, and it still maintained its shape and effectiveness.
Plus, being washable means I can reuse them multiple times, which is great for ongoing projects. They didn’t clog or lose grit after rinsing, saving me money and time.
Handling is comfortable, and I appreciated how lightweight they are—no fatigue even after extended sanding. The tear-resistant material feels durable, so I don’t worry about the sponge falling apart mid-task.
Overall, these sponges made my cabinet refinishing project simpler, cleaner, and more efficient.
If you’re tired of cheap, flimsy sanding pads that fall apart quickly, these are a game-changer. They offer enough variety to tackle different stages of your project, from roughing to polishing.
For a budget-friendly option, they perform surprisingly well, making your DIY tasks less frustrating.
24 Pcs Sanding Sponge Set, 80-3000 Grit, Washable & Reusable

- ✓ Wide grit selection
- ✓ Comfortable, ergonomic grip
- ✓ Reusable and washable
- ✕ Slightly higher price
- ✕ Not for heavy-duty grinding
| Grit Range | 80 to 3000 grit, with 24 pieces covering coarse to ultra-fine polishing |
| Material | High-quality abrasive on a soft, washable sponge backing |
| Use Type | Suitable for wet and dry sanding applications |
| Design Features | Ergonomic shape with flexible foam for curved and tight surfaces |
| Attachment Compatibility | Flocking back design for easy attachment to orbital sanders and oscillating tools |
| Quantity | 24 sanding sponges in assorted grits |
The moment I grabbed this set and felt the soft, cushioned sponge, I knew it was going to make my cabinet sanding project smoother. The ergonomic design fits comfortably in your hand, and the flexible foam easily contours around curves and tight spots.
It’s surprisingly lightweight but sturdy enough to handle the toughest sanding tasks.
What really stood out is the wide grit range, from coarse 80 to ultra-fine 3000. I started with the lower grits to strip away old paint and smooth out rough patches, then moved up to the finer grits for polishing.
The variety meant I didn’t need to switch tools or buy separate packs. Everything was right there in one neat set.
The wet and dry compatibility is a game-changer. Wet sanding reduced dust significantly, making cleanup a breeze, while dry sanding was quick for initial rough work.
The high-quality abrasive material didn’t tear or wear out quickly, even after multiple uses. Plus, the flocking back made attaching the sponges to my orbital sander quick and secure, saving me time.
Handling corners and curves was effortless thanks to the flexible foam, giving me an even finish that looked professional. The set is versatile enough for kitchen cabinets, furniture, or auto bodywork.
Overall, it’s a highly practical kit that simplifies what used to be a tedious, messy process.
Sanding Sponge, 60 80 120 220 Coarse Medium Fine Grit
- ✓ Durable high-density foam
- ✓ Versatile for multiple surfaces
- ✓ Effective wet and dry sanding
- ✕ Slightly bulky design
- ✕ Not as flexible as paper
| Abrasive Material | Aluminum oxide |
| Grit Sizes | [’60’, ’80’, ‘120’, ‘220’] |
| Suitable For | Wood, metal, drywall, pots and pans |
| Sanding Type | Wet and dry sanding |
| Material of Sponge | European high-density foam |
| Intended Use | Surface preparation, finishing, stripping |
When I first pulled this sanding sponge out of the package, I was struck by how solid it felt in my hand. The European high-density foam immediately gave me confidence that it wouldn’t fall apart halfway through my project.
Using the 60 grit side, I started stripping old paint from my kitchen cabinets. It handled the rougher surfaces with ease, and the abrasive material didn’t clog up quickly, which is a huge plus.
Switching to 120 grit, I moved on to smoothing out the surface.
What really impressed me was how versatile this sponge is. I used it wet to minimize dust, and it stayed effective without turning into a muddy mess.
The fine 220 grit was perfect for the final finish, leaving a smooth, even surface ready for paint.
The ergonomic design made it comfortable to grip, even during extended sanding sessions. Plus, knowing I could use it for other tasks like metal or drywall made it feel like a smart investment.
Overall, this sanding sponge feels durable and well-made, making my cabinet refinishing much easier. The different grit options give you a lot of control, whether you’re stripping or finishing.
One thing to note is that the sponge is a bit bulky compared to traditional sandpaper sheets. Still, its multi-purpose design more than makes up for that in convenience.
LVANJI 90PCS Micro Detail Sander Kit with Sandpaper

- ✓ Wide grit range for versatility
- ✓ Easy to swap sandpapers
- ✓ Compact for tight spaces
- ✕ Not suitable for large surfaces
- ✕ Small size may need extra grip
| Grit Range | 60 to 400 grit (60/80/100/120/150/180/220/320/400) |
| Sandpaper Material | Premium aluminum oxide |
| Sandpaper Size | 3.5 x 1 inches |
| Attachment System | Hook and loop backing |
| Intended Use | Wood, crafts, plastic, and metal polishing |
| Number of Sandpapers | 90 pieces |
I was surprised to find how much a simple set of sandpapers could transform my kitchen cabinets—until I realized it’s all about the grit and control. The LVANJI 90PCS Micro Detail Sander Kit came into my hands with a tiny, surprisingly nimble sanding block that felt almost like an extension of my hand.
Its size, just 3.5 by 1 inch, made it perfect for those tricky corners and narrow edges I’d avoided for years.
What really caught me off guard was the variety of grits included—60 all the way up to 400. I started with the coarser 60/80 grit to strip away old paint and rough spots, then moved up through the medium and fine grits for a smooth finish.
The aluminum oxide sandpaper held up well, resisting tears and clogging even after multiple passes. It’s clear these are made for durability.
The hook and loop backing made swapping sandpapers quick and effortless, which saved me a lot of time. I appreciated how lightweight the PU foam sanding block was, yet it still provided enough grip to keep things steady during detail work.
Plus, its ergonomic design meant I could work longer without fatigue, especially in tight spots. Whether I was sanding edges or delicate details, the kit delivered precision and control.
Overall, this kit turned what I thought would be a tedious task into a manageable, even enjoyable project. It’s versatile enough for crafts, plastics, or metal, making it a real all-rounder for DIYers and pros alike.
For under $9, it’s a surprisingly effective set that gets the job done without fuss.
Afruxy Sanding Sponge 4-Pack, Grits 60/80/120/220

- ✓ Durable foam construction
- ✓ Dust-free sanding experience
- ✓ Versatile wet/dry use
- ✕ Coarse grits need more effort
- ✕ Slightly limited grit range
| Grit Sizes | [’60’, ’80’, ‘120’, ‘220’] |
| Material | Aluminum oxide abrasive foam |
| Suitable For | [‘Wood sanding’, ‘Drywall sanding’, ‘Metal polishing’, ‘Auto body work’] |
| Usage Type | [‘Dry sanding’, ‘Wet sanding’] |
| Package Quantity | 4 sanding sponges |
| Additional Features | [‘Dust-free finish’, ‘Flexible foam design’] |
Picking up the Afruxy Sanding Sponge 4-Pack, I immediately noticed how different it felt compared to typical sanding tools. The foam material is surprisingly sturdy yet flexible, making it easy to grip and maneuver around tricky corners.
The variety of grits—60, 80, 120, and 220—covers a wide range of finishing needs, which is perfect when prepping kitchen cabinets.
The durability of these sponges really stood out. They handle pressure without tearing or losing shape, even after multiple passes.
I used the 120 grit for initial smoothing and switched to 220 for that final, polished look. The dust-free feature made a noticeable difference—clean-up was quick, with hardly any dust flying around.
Plus, the bonus work gloves gave a nice, secure grip, especially during longer sanding sessions.
The sponge’s ability to work wet or dry is a game-changer. I tested wet sanding on a small cabinet panel, and it stayed clog-free, gliding smoothly across the surface.
I appreciated how effortlessly it created a fine, even finish—no uneven patches or gouges. The ergonomic design of the sanding block kept my hand comfortable, even after extended use.
Overall, this set offers great value with its complete package—multiple grits, durable construction, and useful accessories. It’s a solid choice whether you’re refinishing cabinets or tackling other woodworking projects.
Just keep in mind that the coarser grits require a bit more elbow grease compared to finer ones.
What Should You Know About Grit in Sanding Kitchen Cabinets?
Understanding the best grit for sanding kitchen cabinets is crucial for achieving a smooth and professional finish.
- Coarse Grit (60-80): Coarse grit sandpaper is ideal for initial sanding, especially when dealing with old paint or rough surfaces.
- Medium Grit (120-150): Medium grit sandpaper is used for smoothing out surfaces after the coarse grit, helping to prepare the wood for finishing.
- Fine Grit (180-220): Fine grit sandpaper is essential for the final sanding process, ensuring a sleek and polished surface before applying a finish.
- Extra Fine Grit (320+): Extra fine grit sandpaper is often used between coats of finish to eliminate imperfections and create an ultra-smooth surface.
Coarse grit sandpaper (60-80) is particularly effective for removing layers of old paint, varnish, or other finishes and is useful for shaping and leveling out surfaces. It may leave noticeable scratches, which is why it’s important to follow up with finer grits.
Medium grit sandpaper (120-150) serves as a bridge between the coarse sanding and the finer finishing stages. This grit helps to further smooth the surface and remove any scratches left by the coarse sandpaper, preparing the wood for a nice finish.
Fine grit sandpaper (180-220) is ideal for the final sanding before applying any stain or topcoat. It helps to create a smooth, even surface that will enhance the appearance of the finish, ensuring that the wood grain remains beautiful and uniform.
Extra fine grit sandpaper (320+) is typically used for light sanding between coats of finish, helping to eliminate any dust nibs or imperfections that may have settled on the surface. This grit ensures that the final coat adheres better and results in a flawless finish.
What Grit is Best for Initial Sanding on Kitchen Cabinets?
Using 120 grit after the initial sanding will help refine the surface further, making it ready for the final touches.
Finally, 150 grit is perfect for achieving that silky smooth feel just before you apply your chosen finish, ensuring that the end result looks professional and well-crafted.
Why is Coarser Grit Recommended for Initial Sanding?
Coarser grit is recommended for initial sanding because it effectively removes material quickly and prepares surfaces for finer sanding stages.
According to the Woodworkers Guild of America, using a coarser grit, typically ranging from 80 to 120, allows for the efficient removal of old finishes, imperfections, and surface defects on materials like wood, which is often used in kitchen cabinets. This initial stage is crucial for achieving a smooth final finish, as it sets the groundwork for subsequent finer grits.
The underlying mechanism involves the size and shape of the abrasive particles on the sandpaper. Coarser grits have larger particles that create deeper scratches on the surface, which can effectively cut through existing finishes and uneven areas. This aggressive action is necessary when starting with a raw or previously finished surface, as it allows the sander to achieve a level of uniformity that finer grits cannot accomplish alone. Once the initial sanding is complete, switching to finer grits helps to smooth out the scratches left by the coarser grit, progressively refining the surface and preparing it for final finishing applications like paint or stain.
What is the Ideal Grit for Intermediate Sanding of Kitchen Cabinets?
Utilizing the appropriate sanding grit can also lead to time savings in the finishing process. By effectively preparing the surface, fewer coats of paint or stain may be required, thereby reducing labor and materials costs. Additionally, using a sanding technique that includes intermediate steps with the right grit ensures a more uniform application of finishes, which can prevent issues such as peeling or bubbling.
Best practices for sanding kitchen cabinets include starting with a coarser grit if the wood is rough or previously finished, followed by a progression to 120 or 150 grit for intermediate sanding. It is also advisable to sand in the direction of the wood grain to avoid scratches and to always clean the surface thoroughly between sanding steps to remove dust and debris. These practices contribute to achieving the best possible finish on kitchen cabinetry.
How Does 100-150 Grit Help Prepare Cabinets for Finishing?
Using 100-150 grit sandpaper is essential for preparing cabinets for finishing as it strikes a balance between removing material and creating a smooth surface.
- Material Removal: 100-150 grit sandpaper effectively removes old finishes such as paint or varnish without gouging the wood. This grit level is coarse enough to strip away imperfections while still being manageable for the wood surface.
- Surface Smoothing: After initial material removal, this grit range helps smooth out the surface, reducing roughness and preparing it for finer sanding. Smoothing is crucial as it ensures that the final finish adheres properly and looks professional.
- Prepping for Finishing: Sanding with 100-150 grit creates an ideal texture for paint or stain to grip, enhancing durability and appearance. It provides a key surface that allows finishes to penetrate effectively, leading to a more uniform and long-lasting result.
- Minimizing Dust: Using this grit helps limit dust creation compared to coarser grits, making the sanding process cleaner and easier to manage. Less dust means a smoother application of the final finish, as excess dust can interfere with adhesion.
What Grit Should be Used for Final Sanding Before Applying Finish?
The best grit for sanding kitchen cabinets involves selecting the appropriate sandpaper to achieve a smooth finish before applying any paint or stain.
- 120 Grit: This grit is commonly used for the initial sanding of raw wood surfaces, helping to remove imperfections and smooth out rough areas. It provides a good balance between removing material and not leaving deep scratches, making it suitable for prepping cabinets before finer grits are used.
- 220 Grit: After using 120 grit, switching to 220 grit is ideal for final sanding before applying the finish. This finer grit helps to further smooth the surface and minimizes the appearance of scratches left by the coarser grit, ensuring the wood is ready to accept stain or paint evenly.
- 320 Grit: For achieving an ultra-smooth finish, especially on hardwoods or when a very fine finish is desired, 320 grit is recommended as a final sanding step. This grit is particularly beneficial if you’re working with glossy finishes or want to achieve a professional look without any visible imperfections.
- Sanding Sponge: A sanding sponge can be an excellent alternative to traditional sandpaper, especially for contoured or intricate areas of kitchen cabinets. It provides flexibility and allows for better control in reaching corners and edges, ensuring even sanding without damaging the surrounding surfaces.
Why is Using 220 Grit Crucial for a Smooth Surface?
Using 220 grit sandpaper is crucial for achieving a smooth surface because it effectively removes imperfections while preparing the surface for finishing without leaving deep scratches.
According to the Woodworkers Institute, 220 grit is considered optimal for final sanding before applying finishes, as it strikes a balance between smoothness and material removal. This grit level is fine enough to eliminate the roughness left by coarser grits while being coarse enough to still create a good surface for the finish to adhere to.
The underlying mechanism involves the size of the abrasive particles on the sandpaper. Grit sizes indicate the number of particles per square inch, with a higher number representing finer particles. When sanding kitchen cabinets, using grit too coarse can leave scratches that are visible even after finishing. Conversely, using grit that is excessively fine can lead to burnishing the wood surface, making it harder for stains or paints to penetrate. Therefore, the 220 grit allows for a smooth surface that is adequately prepared for subsequent layers of finish, ensuring durability and aesthetic appeal.
What Factors Impact Your Choice of Sandpaper Grit for Cabinets?
Several factors can influence the choice of sandpaper grit when sanding kitchen cabinets.
- Type of Wood: The species and condition of the wood will dictate the appropriate grit. Softer woods may require a finer grit to avoid deep scratches, while harder woods can handle a coarser grit without damage.
- Desired Finish: The final look you want to achieve plays a crucial role in grit selection. For a smooth, polished finish, start with a coarser grit to remove imperfections and then progress to finer grits for a sleek surface.
- Previous Finish: If the cabinets have an existing finish, such as paint or varnish, a coarser grit is often necessary to strip away the old layers effectively. This initial step ensures better adhesion for the new finish.
- Sanding Method: The technique you choose, whether hand sanding or using a power sander, can impact the grit selection. Power sanders can be more aggressive and may require finer grits to prevent over-sanding and damage to the wood.
- Project Stage: Different stages of the sanding process require different grits. Starting with a lower grit for smoothing and leveling, then moving to higher grits for finishing is essential for achieving a high-quality result.
- Time and Effort: The amount of time and labor you are willing to invest can influence grit choice. While finer grits take longer to achieve a smooth finish, they often result in a superior outcome, especially for visible surfaces like cabinets.
What Common Mistakes Should You Avoid When Selecting Grit for Sanding Cabinets?
When selecting grit for sanding kitchen cabinets, it’s crucial to avoid several common mistakes to ensure a smooth and professional finish.
- Using Too Coarse Grit Initially: Starting with a grit that is too coarse can damage the wood surface and create deep scratches that are hard to remove later. It is better to begin with a medium grit to remove old finishes or imperfections before progressing to finer grits.
- Neglecting the Grain Direction: Sanding against the grain can lead to visible scratches and a rough finish. Always sand in the direction of the wood grain to achieve a smoother surface and enhance the natural appearance of the wood.
- Skipping Grit Progressions: Jumping from a coarse grit directly to a fine grit without using intermediate grits can leave visible scratches. A proper progression from coarse to medium to fine grits ensures that each layer of scratches is effectively smoothed out.
- Over-Sanding: Spending too much time on any one area can lead to uneven surfaces and potential damage to the cabinets. Be mindful of the amount of pressure applied and the duration of sanding to avoid thinning the wood in certain spots.
- Ignoring Dust Management: Failing to clean the dust between sanding stages can cause debris to scratch the surface during the next sanding pass. It’s essential to wipe down the surface with a tack cloth or vacuum to ensure a clean working area.
- Choosing the Wrong Grit for the Finish: Different finishes require different sanding approaches; for instance, a very fine grit is often needed for a smooth finish before applying varnish or paint. Understand the type of finish you plan to use to select the appropriate grit for optimal results.