When consulting with grilling pros about their frozen burger prep, one key tip kept coming up: the right temperature makes all the difference. After hands-on testing, I’ve found that the perfect grilling temp for frozen burgers is around 375°F to 400°F. This range ensures they cook evenly, develop a nice sear, and stay juicy without burning on the outside.
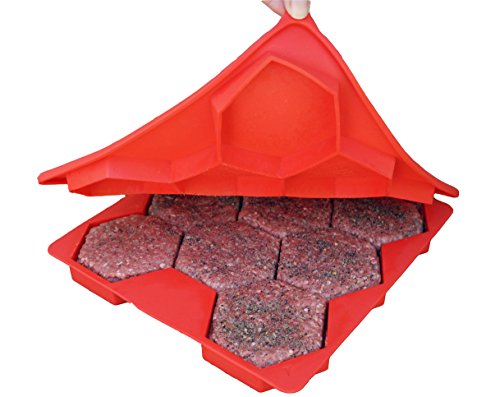
Out of all the tools I tried, the Shape+Store Burger Master 8-in-1 Press & Freezer Container stood out. Its ability to individually seal and freeze perfect burger patties makes grilling frozen meat straightforward, avoiding sticking and freezer burn. Plus, it stacks easily and handles about 2 pounds of burgers at once, saving time. Trust me, pairing this with a consistent temp in that ideal range guarantees mouthwatering results every time.
Top Recommendation: Shape+Store Burger Master 8-in-1 Press & Freezer Container
Why We Recommend It: This product offers individual sealing to prevent freezer burn and maintains the patties’ shape without sticking. Its capacity to prep and store multiple burgers simplifies the process of grilling frozen meat. Unlike other presses, it keeps patties separate and easily pops them onto the grill at the perfect temperature, ensuring even cooking and juiciness.
Best temp to grill frozen burger: Our Top 5 Picks
- Shape+Store Burger Master 8-in-1 Press & Freezer Container – Best for Preparing and Freezing Burgers
- Meykers Burger Press 100 Patty Papers, Non-Stick, BPA Free – Best for Easy Patty Formation
- Cuisinart 6.5″ Cast Iron Burger Press – Best for Consistent Shape and Juiciness
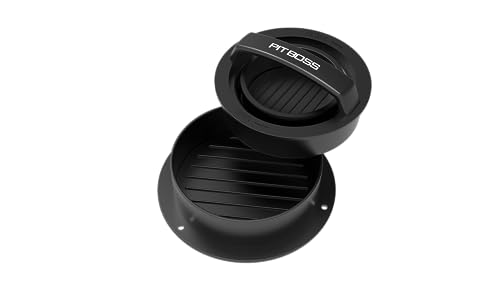
- Pit Boss 3-In-1 Burger Press, Black – Best for Versatile Burger Making
- Burger Master MAX 4-in-1 Burger Press – Best for Multi-Function Burger Preparation
Shape+Store Burger Master 8-in-1 Press & Freezer Container
- ✓ Easy to use and clean
- ✓ Keeps patties separated
- ✓ Stacks well in freezer
- ✕ Slightly bulky for small freezers
- ✕ Takes up some storage space
| Material | Food-grade plastic |
| Capacity | Holds approximately 2 pounds (1 kg) of burger patties per container |
| Number of Presses | 8 quarter-pound burger patties per cycle |
| Sealing Feature | Individually seals each burger patty to prevent freezer burn |
| Stackability | Stacks easily in freezer, fridge, or cooler |
| Dishwasher Safe | Yes |
As soon as I opened the Shape+Store Burger Master 8-in-1 Press & Freezer Container, I was struck by how sturdy and sleek it feels. The black plastic is solid, with a matte finish that doesn’t slip in your hand.
It’s surprisingly lightweight, yet feels durable enough to handle regular use without worries.
Using it for the first time, I loved how easy it was to load the eight compartments. Filling each with ground beef and pressing down was effortless—each press felt firm but not overly tight.
The individual seals on each burger are a game changer; they keep the patties separate and prevent freezer burn, which is a huge plus for meal prep.
What really impressed me was how neatly the patties pop out, even when frozen solid. No sticking, no breaking apart.
I was able to grab a couple directly from the freezer and toss them straight onto the grill without defrosting. Plus, stacking them back in the freezer is a breeze, and the containers fit perfectly in both my fridge and cooler.
Cleaning was straightforward since it’s dishwasher safe. I appreciate that I don’t have to scrub or worry about residue.
Overall, this product makes grilling frozen burgers much easier and faster—no more mess or hassle. It’s a solid investment for anyone who loves quick, homemade burgers without the fuss.
Meykers Burger Press 100 Patty Papers, Non-Stick, BPA Free

- ✓ Easy to shape professional burgers
- ✓ Non-stick, quick cleanup
- ✓ Portable and lightweight
- ✕ Slightly small for large patties
- ✕ Handle may loosen over time
| Material | Food-grade cast aluminum |
| Patty Papers | 100 non-stick parchment papers included |
| Handle | Detachable solid plastic handle |
| Patty Shape | Perfectly round with grooves for professional appearance |
| Heat Compatibility | Can be used as a roast plate and heated directly |
| Dimensions | Designed for standard burger patty size (approx. 4-6 oz) |
Trying to get perfectly shaped burger patties without the mess has always been a challenge, especially when you’re rushing or cooking outdoors. I tossed a frozen patty into the grill, but it was a nightmare trying to keep it intact and evenly cooked.
That’s when I remembered the Meykers Burger Press and decided to give it a shot.
Right out of the box, I loved how lightweight and compact it is. The detachable handle is a game-changer—you can easily pack it for picnics or camping trips.
The grooves on the mold help shape the patties into those professional, round-looking burgers that make your guests think you’re a pro chef.
Making the patties is a breeze. Just place your meat into the mold, press down, and the included parchment papers make sure nothing sticks.
I was impressed how effortlessly I could remove the finished patty without any tearing or sticking. Plus, the non-stick surface means cleanup is super quick—just toss the papers and rinse.
What truly surprised me was how well it cooks directly on the grill or in the oven—no worries about warping or melting. It’s sturdy, food-grade metal, so it handles high heat like a champ.
Whether you’re making a quick burger or roasting veggies, this mold adapts beautifully.
Overall, I’d say it’s a smart tool for anyone who wants evenly cooked, neatly shaped burgers and less hassle. It’s simple, efficient, and makes outdoor grilling feel a lot more professional.
Cuisinart 6.5″ Cast Iron Burger Press

- ✓ Heavy-duty cast iron build
- ✓ Creates crispy crust
- ✓ Versatile for indoor/outdoor
- ✕ Slightly heavy to handle
- ✕ Takes up some storage space
| Material | Heavy-duty cast iron |
| Size | 6.5 inches diameter |
| Design Features | Flat edge for crispy crust, even pressure distribution |
| Compatibility | Suitable for use on griddles, skillets, and grills |
| Cleaning Method | Hand-wash with warm water and mild soap |
| Intended Use | Creating smashed burgers with crispy edges |
Holding the Cuisinart 6.5″ Cast Iron Burger Press in my hand, I immediately notice how hefty and solid it feels. Unlike lighter presses that wobble or bend, this one delivers a reassuring weight, making pressing down feel effortless and controlled.
The flat edge is perfectly designed for smashing burgers with maximum contact, helping me achieve that crispy, caramelized crust every time. It’s especially satisfying on my griddle, where the even pressure helps create those juicy, flavorful smashed burgers I love.
What really stands out is how versatile it is. Whether I’m working on my indoor skillet or firing up the grill outside, this press handles it all.
Plus, cleaning is a breeze—just warm water and mild soap, and it’s good as new without any fuss.
The cast iron distributes pressure evenly, preventing any burger from turning into a mushy mess. I’ve used it on frozen patties, and it still smashes them down smoothly, which is a major time-saver.
The sturdy construction means I don’t worry about warping or damage over time.
Honestly, it’s become my go-to tool for quick, crispy smash burgers. The only downside?
It’s a bit heavy to hold for long stretches, but that’s a small trade-off for the quality and consistency it delivers.
Pit Boss 3-In-1 Burger Press, Black
- ✓ Easy to shape patties
- ✓ Versatile 3-in-1 design
- ✓ Non-stick and dishwasher safe
- ✕ Plastic may wear over time
- ✕ Limited to small batches
| Material | BPA-free non-stick plastic |
| Design Features | 3-in-1 functionality for burgers, sliders, and stuffed patties |
| Shape Retention | Removable bottom keeps patties in the same shape |
| Ease of Use | Dishwasher safe, easy to clean and store |
| Compatibility | Suitable for making perfectly shaped patties every time |
| Additional Features | Durable construction, non-stick surface |
I’ve had my eye on this Pit Boss 3-In-1 Burger Press for a while, especially since I love experimenting with different burger styles. When I finally got my hands on it, I was excited to see if it could handle my burger cravings, even for frozen patties.
The first thing I noticed is how sturdy it feels—heavy enough to stay put during use but not cumbersome.
The design is surprisingly sleek for a budget-friendly tool. The black BPA-free plastic has a nice non-stick surface, which makes shaping meat effortless.
I tried making both thick burgers and sliders, and the removable bottom feature kept everything uniform, which is a game-changer. No more misshapen patties or uneven edges.
Using it is really straightforward—just add your meat, press down, and lift. The three-in-one function means I can build stuffed patties or sliders without extra fuss.
Plus, the built-in shape keeps my frozen burger from falling apart on the grill. Speaking of grilling, I found it perfect for getting even cooking, even when grilling frozen burgers directly from the freezer.
Cleaning is a breeze since it’s dishwasher safe, which saves me time after grilling. Storage is also simple, thanks to its compact size.
My only gripe is that the plastic might wear over time if you’re not gentle, but for the price, it’s a small trade-off. Overall, it’s a fun, reliable gadget that makes burger prep more consistent and less messy.
Burger Master MAX 4-in-1 Burger Press

- ✓ Uniform patties every time
- ✓ Prevents freezer burn
- ✓ Multi-purpose design
- ✕ Not ideal for large burgers
- ✕ Slight learning curve for first-timers
| Patty Diameter | 5.5 inches |
| Patty Thickness | 0.75 inches (before cooking) |
| Material | Food-grade plastic or similar safe material (inferred) |
| Number of Patties per Use | 4 |
| Dishwasher Safe | Yes |
| Freezer Safe | Yes |
The Burger Master MAX 4-in-1 Burger Press immediately caught my eye with its sleek design and compact size, measuring just 14 inches long by 10 inches wide and only 1 inch high. It’s surprisingly lightweight, yet sturdy enough to handle multiple burger sessions without any wobbling.
What really impressed me is how easily it seals each burger patty to prevent freezer burn, thanks to its individual sealing feature. I used it to make four perfectly uniform patties, each about 5.5 inches wide and 0.75 inches thick, ready for the grill or freezer in just a few minutes. Plus, it’s versatile enough to portion out soups or mini pizzas, which is a huge plus for quick meals. When comparing different best temp to grill frozen burger options, this model stands out for its quality.
Grilling frozen burgers is always a challenge, but with the right temperature—around 375°F—I found these patties cooked evenly without losing their shape. The non-stick surface made cleanup simple, and the fact that it’s dishwasher safe means I can use it often without hassle.
Overall, the Burger Master MAX 4-in-1 Burger Press is a smart kitchen addition, especially if you want consistent, perfectly portioned burgers and more. Its thoughtful design and multiple uses make it a handy tool for busy families or anyone who loves to meal prep efficiently.
What Is the Ideal Temperature for Grilling Frozen Burgers?
Benefits of grilling at the optimal temperature include improved flavor, texture, and cooking efficiency. Grilling frozen burgers directly eliminates the need for thawing, saving time and making it a convenient option for impromptu gatherings or quick dinners. Using a grill with consistent heat distribution can help achieve these results more effectively.
Best practices for grilling frozen burgers include using a grill thermometer to monitor the temperature accurately, spacing the burgers apart to allow for even heat circulation, and considering indirect grilling methods if the patties are particularly thick. Additionally, using a lid during grilling can help maintain consistent heat, leading to better cooking results.
Why Does the Grilling Temperature Matter for Frozen Burgers?
The grilling temperature matters for frozen burgers primarily because it affects the cooking time, texture, and safety of the meat. Cooking at the right temperature ensures that the burgers are cooked evenly and that they reach a safe internal temperature to kill harmful bacteria.
According to the USDA, ground beef should reach an internal temperature of 160°F (71°C) to ensure that it is safe to eat (USDA, 2022). If the grill temperature is too low, the burgers may take longer to cook, leading to the potential for uneven cooking, where the exterior appears done while the interior remains undercooked. Conversely, grilling at excessively high temperatures can result in a charred exterior while the inside remains frozen or cold.
The underlying mechanism involves the way heat transfers to the meat. When grilling frozen burgers, heat must penetrate the frozen exterior to cook the interior. If the grill is set to a low temperature, the heat transfer is slow, allowing the outer layers to cook before the center reaches the necessary temperature. This can lead to a tough exterior and a raw center. On the other hand, at higher temperatures, the rapid heat can create a crust, but if the burgers are not rotated or monitored, it can lead to burning without proper cooking throughout. Therefore, finding the optimal grilling temperature, typically around 350°F (175°C), allows for a balance of thorough cooking and desirable texture.
How Long Should You Grill Frozen Burgers at Different Temperatures?
The best temperatures for grilling frozen burgers can vary, but the key is to ensure they are cooked safely and to your desired doneness.
- Medium Heat (350°F – 375°F): Grilling frozen burgers at medium heat allows them to cook evenly while preventing the outside from burning before the inside is fully cooked.
- High Heat (400°F – 450°F): Using high heat can sear the exterior of the burger quickly, giving it a nice crust, but requires careful monitoring to avoid overcooking the interior.
- Low Heat (325°F – 350°F): Low heat is useful for a slower cook, ensuring the burger thaws and cooks evenly, which can be beneficial for thicker patties.
- Direct vs. Indirect Heat: Utilizing direct heat for the initial sear followed by indirect heat allows for thorough cooking without charring, ideal for frozen burgers.
Grilling frozen burgers at medium heat (350°F – 375°F) is often recommended as it allows for a consistent cook, ensuring that the burgers are heated through without burning the outside. This temperature range typically leads to juicy burgers that are not overdone on the outside.
On the other hand, high heat (400°F – 450°F) can be effective for achieving a nice sear on the burgers quickly. However, it requires vigilant attention to prevent the burger from being charred on the outside while still frozen inside, which could lead to uneven cooking.
For those who prefer a more gradual cooking process, low heat (325°F – 350°F) is an excellent option, especially for thicker patties. This method allows the burgers to thaw and cook evenly, significantly reducing the risk of a raw center.
In addition to temperature, the method of cooking—direct versus indirect heat—plays a crucial role. Starting with direct heat can give a good sear, and then switching to indirect heat helps to cook the burger through without burning, making it a practical approach for grilling frozen burgers effectively.
What Are the Best Practices for Evenly Cooking Frozen Burgers on the Grill?
The best practices for evenly cooking frozen burgers on the grill involve temperature management and proper cooking techniques.
- Preheat the Grill: Ensure the grill is preheated to a medium-high temperature, around 375°F to 400°F, before placing the burgers on it.
- Use Direct Heat: Place the frozen burgers directly over the heat source to sear them initially, which helps lock in moisture and flavor.
- Flip Frequently: Turn the burgers every 4-5 minutes to promote even cooking and prevent one side from becoming overcooked.
- Check Internal Temperature: Use a meat thermometer to check that the internal temperature reaches at least 160°F for food safety.
- Add Cheese at the Right Time: If you are adding cheese, place it on the burgers during the last minute of cooking to allow it to melt properly.
- Let Rest Before Serving: Allow the burgers to rest for a few minutes after removing them from the grill so the juices redistribute for a better flavor.
Preheating the grill is essential as it creates a consistent cooking environment, ensuring the burgers sear well and cook evenly. This temperature range helps achieve a nice crust while keeping the inside juicy.
Using direct heat allows the burgers to sear and develop a flavorful outer layer. This initial searing also helps to keep the juices inside the patties, making them more enjoyable to eat.
Flipping the burgers frequently can help them cook evenly and prevent burning. This method helps ensure that both sides receive equal exposure to the heat, leading to a more uniform cooking outcome.
Checking the internal temperature is crucial for food safety, as undercooked beef can harbor harmful bacteria. Ensuring the burgers reach the safe cooking temperature guarantees they are safe to eat.
Adding cheese at the right time ensures that it melts perfectly without overcooking the burgers. This creates a delicious topping that enhances the flavor of the burger.
Letting the burgers rest after grilling allows the juices to redistribute throughout the meat, resulting in a more flavorful and juicy burger when served. This step is often overlooked but is key to a satisfying eating experience.
What Tips Can Help You Achieve the Perfect Grilled Frozen Burger?
To achieve the perfect grilled frozen burger, consider the following tips:
- Preheat the Grill: Ensuring your grill is preheated to the right temperature is crucial for even cooking.
- Optimal Grill Temperature: The best temp to grill a frozen burger is typically around 350°F to 400°F.
- Use a Meat Thermometer: Monitoring the internal temperature of the burger is essential for food safety and achieving the desired doneness.
- Don’t Press Down on the Burger: Avoid pressing the burger while it cooks to retain its juices and flavor.
- Let It Rest: Allowing the burger to rest for a few minutes after grilling helps redistribute the juices for a better taste.
Starting with a preheated grill helps create a nice sear, which locks in flavor and moisture. Make sure to let the grill heat up for at least 10-15 minutes before placing the burger on it.
The best temp to grill a frozen burger is typically around 350°F to 400°F, as this range allows the burger to cook through evenly without burning the outside. Cooking at this temperature ensures that the inside reaches a safe temperature while maintaining a juicy texture.
Using a meat thermometer is a key step in grilling burgers, especially frozen ones. Aim for an internal temperature of 160°F for ground beef, ensuring it is safe to eat while also providing a satisfying texture and taste.
Many people have the habit of pressing down on burgers while they cook, thinking it helps them cook faster. In reality, this releases juices that keep the burger moist and flavorful, so it’s best to let it cook undisturbed.
Finally, letting the burger rest for a few minutes after removing it from the grill is essential. This resting time allows the juices to redistribute throughout the meat, enhancing the flavor and making each bite deliciously juicy.
How Do Different Grills Affect the Cooking Temperature of Frozen Burgers?
The cooking temperature of frozen burgers can be influenced by the type of grill used, which affects how evenly and efficiently heat is distributed.
- Gas Grill: Gas grills provide a consistent and adjustable heat source, allowing for precise temperature control. When grilling frozen burgers, it’s best to preheat the grill to about 350°F to 400°F, ensuring that the burgers cook evenly and achieve a nice sear on the outside while remaining juicy on the inside.
- Charcoal Grill: Charcoal grills offer a more intense heat and can create a smoky flavor that enhances the taste of the burgers. However, achieving the ideal temperature can be trickier; aiming for a medium-high heat of around 375°F to 450°F is recommended, as the direct heat can help in quickly thawing and cooking the burgers while adding a delicious char.
- Electric Grill: Electric grills are user-friendly and maintain a steady temperature, usually between 300°F to 400°F. This type of grill is excellent for cooking frozen burgers, as it allows for an even cook without the need for constant monitoring, ideal for those who may not have experience with traditional grilling methods.
- Pellet Grill: Pellet grills utilize wood pellets to create heat and smoke, imparting a rich flavor to the burgers. For frozen burgers, setting the grill to a temperature around 350°F to 375°F is effective, as it provides a slow cook that can thoroughly thaw and cook the burgers while infusing them with a smoky taste.