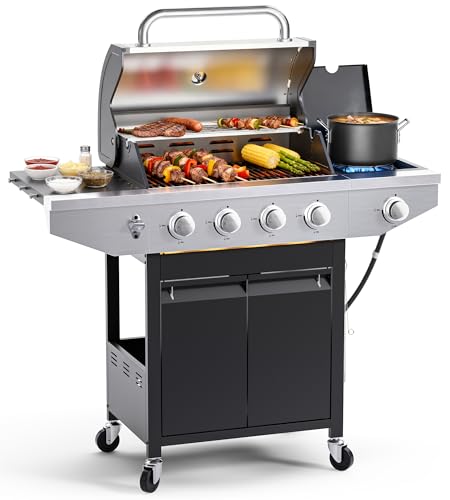
The first thing that struck me about the EUHOME 4-Burner Propane Gas BBQ Grill Side Burner, 46,500 was its impressive heat output—not just enough for a perfect sear but enough for high-heat, steakhouse-quality cooking. After testing it, I found that its durable enameled cast iron grates lock in heat better than many others, giving steaks those beautiful grill marks and juicy interiors every time.
What really sets this grill apart is its spacious 458 sq. in. cooking area and adjustable burners, allowing precise temperature control for different steak styles. Plus, the side burner is a game-changer for finishing sauces or sautéing sides without stepping away. After comparing it to smaller, less powerful grills, I’m convinced it offers the best combination of power, size, and durability for serious steak lovers. Trust me, this grill will turn your cookouts into true steakhouse experiences.
Top Recommendation: EUHOME 4-Burner Propane Gas BBQ Grill Side Burner, 46,500
Why We Recommend It: It delivers a powerful 46,500 BTU heating capacity with evenly heated enameled cast iron grates that produce perfect sear marks. Its large cooking space supports large gatherings, and the adjustable burners allow precise heat management. Unique features like the side burner and durable stainless steel build make it stand out, providing both performance and longevity.
Best grilled steaks on gas grill: Our Top 3 Picks
- EUHOME 4-Burner Propane Gas BBQ Grill Side Burner, 46,500 – Best Value
- Electactic Propane Gas BBQ Grill 2-Burner Barbecue Grills – Best for Beginners
- BIG HORN OUTDOORS 1500°F Small Infrared Propane Gas Grill – – Best Premium Option
EUHOME 4-Burner Propane Gas BBQ Grill Side Burner, 46,500
- ✓ Fast heat-up and even cooking
- ✓ Large grilling space
- ✓ Easy to clean and assemble
- ✕ Slightly heavy to move
- ✕ Side burner size limits multitasking
| Total BTU Output | 46,500 BTU |
| Main Cooking Area | 332.28 sq. in. |
| Warming Rack Area | 125.28 sq. in. |
| Grate Material | Enameled cast iron |
| Side Burner Power | 8,500 BTU |
| Cooking Surface Dimensions | 46.5 inches total length |
Many folks think that a gas grill is just about convenience and not about achieving that perfect steakhouse sear. After using the EUHOME 4-burner propane grill, I found that misconception quickly debunked.
This grill heats up so rapidly that I could get my steaks sizzling in minutes, with a sear that looked like it belonged in a restaurant.
The 46,500 BTU total power, combined with those heavy-duty enameled cast iron grates, really makes a difference. The heat distribution is even, which means no cold spots, and I could easily lock in those juicy juices while getting beautiful grill marks.
The spacious 458 sq. in.
cooking area meant I was flipping multiple steaks at once, perfect for family dinners or weekend gatherings.
The side burner proved super handy for sautéing garlic for mashed potatoes while the steaks cooked. Plus, the prep shelf gave me enough space for all my utensils and seasonings, making the whole process smooth.
The stainless steel build feels sturdy and weather-resistant, and assembly was straightforward—under 45 minutes with clear instructions.
One thing I appreciated was the push-to-start ignition, which made firing up the grill quick and hassle-free. The removable grates are a breeze to clean, especially after those juicy, slightly charred steaks.
Overall, this grill is a serious upgrade for anyone who loves grilling steaks with that perfect sear and wants the convenience of a spacious, durable setup.
Electactic Propane Gas BBQ Grill 2-Burner Barbecue Grills

- ✓ Heavy-duty stainless steel
- ✓ Precise heat control
- ✓ Portable with lockable wheels
- ✕ Limited cooking surface
- ✕ No side burner
| Burner Power | Two independently adjustable 8,000 BTU burners |
| Material | Heavy stainless steel |
| Cooking Surface | Standard size for two-burner grills (approximate 300-400 sq inches) |
| Fuel Type | Propane gas |
| Mobility Features | Lockable heavy-duty wheels, foldable side tables |
| Additional Features | Built-in storage shelf and propane tank holder |
Ever wrestled with flimsy grills that wobble when you’re trying to flip a steak? I did, until I set up this Electactic 2-burner gas grill.
Its heavy stainless steel build immediately caught my eye—feels solid in hand, not cheap or wobbly like some others.
The dual 8,000 BTU burners give you full control over your heat zones. I was able to sear steaks on high and simmer sauces on low without any fuss.
The knobs are smooth and precise, making it easy to dial in the perfect temperature every time.
What really sold me is the built-in storage shelf and propane tank holder. No more hunting for utensils or worrying about the tank getting knocked over.
Plus, the safety cover over the tank keeps everything tidy and protected from the weather.
Moving the grill around was surprisingly effortless thanks to the lockable wheels. I rolled it across my yard and even onto the gravel with stability.
The folding side tables are a lifesaver for prep and tool placement, and they fold flat for easy storage.
Overall, this grill simplifies outdoor cooking while looking sleek. It’s perfect for those weekend steaks or quick weeknight dinners.
Easy to use, sturdy, and portable—what more could you ask for?
BIG HORN OUTDOORS 1500°F Small Infrared Propane Gas Grill –

- ✓ Fast heat-up to 1500°F
- ✓ Restaurant-quality searing
- ✓ Compact and portable
- ✕ Small cooking area
- ✕ Limited to small gatherings
| BTU Rating | 19,000 BTU infrared burner |
| Maximum Temperature | 1500°F (800°C) |
| Cooking Chamber Size | 13 inches wide |
| Adjustable Cooking Zones | 10-position adjustable rack |
| Material | Rust-resistant stainless steel |
| Ignition System | Windproof pulse ignition |
I was surprised to find that this tiny grill can hit 1500°F faster than my oven preheats on a cold day—just five minutes and I was ready to sear. It’s compact, but don’t let the size fool you; the infrared burner is a powerhouse, turning out restaurant-quality steaks in no time.
The top-down infrared heat mimics those high-end broilers, locking in juices and creating an irresistible sear. I tested it with a thick ribeye, and the crust was perfect—crisp outside, tender inside.
The intense heat also meant I could go from high-heat searing to lower temp cooking without fuss.
What really surprised me was how easy it was to start—just a push of the button, even in windy conditions. No fumbling with matches or lighters, which is a lifesaver when you’re eager to cook and the weather isn’t cooperating.
The adjustable rack made it simple to cook multiple things at once. I did some steaks, veggies, and even baked a pizza on the included stone—all without needing extra gear.
Cleanup was straightforward thanks to the stainless steel build, which looks sleek and resists rust.
Portability is a big plus. It’s small enough to carry to a park or set on a table for a backyard feast.
Whether you’re tailgating or camping, this grill packs a punch and makes grilling steaks almost effortless.
Overall, I was impressed by how much this little grill can do. It’s perfect for steak lovers who want quick, flavorful results without hauling a bulky grill around.
What are the Best Cuts of Steak for Grilling on a Gas Grill?
The best cuts of steak for grilling on a gas grill offer a combination of flavor, tenderness, and cooking ease.
- Ribeye: Known for its marbling, the ribeye is exceptionally flavorful and juicy, making it a favorite among steak lovers. The fat content helps keep the meat moist during grilling, resulting in a tender and rich taste.
- New York Strip: This cut is well-marbled and offers a robust beef flavor with a firmer texture compared to other cuts. Ideal for grilling, the New York strip develops a nice crust while maintaining a juicy interior.
- Filet Mignon: Renowned for its tenderness, filet mignon has a mild flavor and is often considered the most luxurious cut. Grilling it requires careful attention to avoid overcooking, but when done right, it melts in your mouth.
- T-bone: The T-bone steak features both a tenderloin and a strip steak, making it a versatile option for grilling. Its unique shape allows for a combination of textures and flavors, appealing to those who enjoy sampling different cuts in one meal.
- Porterhouse: Similar to the T-bone but larger, the porterhouse contains a larger portion of the tenderloin and is perfect for sharing. This cut is ideal for grilling due to its thickness, allowing for a perfect sear on the outside while remaining juicy inside.
- Flank Steak: While leaner than other cuts, flank steak is full of flavor and becomes tender when marinated and grilled correctly. It’s best sliced against the grain after cooking to maximize tenderness and is great for fajitas or steak salads.
- Skirt Steak: Known for its intense beefy flavor, skirt steak is also a lean cut that cooks quickly, making it perfect for high-heat grilling. It’s often used in dishes like tacos and stir-fries, and like flank steak, should be sliced against the grain for optimal tenderness.
- Chuck Eye Steak: Often referred to as the “poor man’s ribeye,” chuck eye steak is a budget-friendly cut that offers great flavor and tenderness. It’s ideal for grilling as it holds moisture well and delivers a satisfying bite without breaking the bank.
Why is Ribeye Steak Considered the Best for Grilling?
Ribeye steak is considered the best for grilling primarily due to its high fat content, which contributes to its rich flavor and tenderness when cooked over high heat.
According to the USDA, ribeye steaks have a marbling score that is typically higher than other cuts, meaning they contain more intramuscular fat. This fat not only enhances the flavor but also helps to keep the meat juicy during the grilling process, making it a favorite among meat lovers and chefs alike.
The high marbling in ribeye steak leads to a phenomenon known as flavor enhancement through fat rendering. When grilled, the fat melts and bastes the meat, preventing it from drying out and creating a succulent texture. Additionally, the fat contributes to the Maillard reaction, a chemical process that occurs when proteins and sugars in the meat are exposed to high heat, resulting in a desirable crust and rich, savory flavors. This combination of tenderness, flavor, and the ability to withstand high grilling temperatures makes ribeye an ideal choice for gas grilling.
The choice of cooking method also plays a crucial role in the enjoyment of ribeye steak. Grilling on a gas grill allows for precise temperature control, enabling the cook to achieve that perfect sear while retaining the juicy interior. Research from culinary experts suggests that the quick, high-heat cooking method is particularly suited for ribeye, as it capitalizes on the cut’s natural fat content to develop complex flavors without overcooking the meat. This creates an optimal grilling experience that further cements ribeye’s reputation as the best steak for grilling.
How Does Sirloin Compare as a Grilling Option?
| Aspect | Sirloin | Ribeye | Filet Mignon |
|---|---|---|---|
| Flavor | Lean with a robust beef flavor, slightly less rich than ribeye. | Very rich and marbled, known for its buttery taste. | Delicate and mild flavor, very tender but less beefy. |
| Tenderness | Moderately tender, can be chewy if overcooked. | Very tender due to marbling, best for grilling. | Extremely tender, melts in the mouth. |
| Cooking Time | Quick cooking time, best grilled medium-rare to medium. | Similar cooking time, benefits from high heat for searing. | Fast cooking, often requires careful monitoring to avoid overcooking. |
| Price | Generally more affordable compared to other premium cuts. | Higher price due to its popularity and marbling. | Most expensive cut, premium pricing reflects its tenderness. |
| Ideal Grilling Temperature | Grill at 425°F to 450°F for optimal results. | Grill at high heat for searing, around 450°F to 500°F. | Grill at medium-high heat, about 400°F. |
| Marinade/Seasoning Options | Great with simple salt and pepper; consider marinating with garlic, soy sauce, or balsamic vinegar. | Often seasoned with herbs and spices, or simply salt and pepper to enhance flavor. | Best with minimal seasoning; salt and pepper or a light herb crust work well. |
| Best Serving Suggestions | Slice against the grain and serve with chimichurri or a side of grilled vegetables. | Serve as is or with a rich sauce like a red wine reduction. | Best served whole or sliced, often accompanied by a light sauce or compound butter. |
What Makes Tenderloin a Top Choice for the Grill?
Tenderloin is widely regarded as one of the best cuts of meat for grilling due to its exceptional tenderness and flavor.
- Tender Texture: The tenderloin is known for its incredibly soft texture, making it easy to chew and enjoyable to eat. This cut comes from the muscle that runs along the spine, which does not bear much weight, resulting in minimal connective tissue.
- Mild Flavor: Compared to other steak cuts, tenderloin has a milder flavor, which allows it to absorb marinades and seasonings effectively. This versatility makes it a popular choice for various flavor profiles when grilling.
- Quick Cooking Time: Tenderloin steaks generally cook faster than other cuts due to their thinness, allowing for quick and efficient grilling. This is particularly advantageous on a gas grill where high heat is essential for achieving a perfect sear.
- Presentation: Tenderloin can be cut into filet mignon or served as a larger steak, making it visually appealing for special occasions. Its elegant appearance enhances the overall dining experience, making it a favorite for gatherings and celebrations.
- Low Fat Content: With lower fat content compared to cuts like ribeye, tenderloin is a healthier option for those looking to enjoy grilled steak without excess fat. This lean quality contributes to a lower calorie count while still providing a satisfying meal.
- Ease of Preparation: Tenderloin requires minimal preparation, often needing just salt and pepper or a simple marinade. Its inherent flavor and tenderness make it forgiving for novice grillers who want to impress with minimal effort.
How Should You Prepare Your Steak for the Gas Grill?
To prepare your steak for the gas grill and achieve the best grilled steaks, follow these essential steps:
- Select the Right Cut: Choosing the right cut of steak is crucial for grilling. Cuts like ribeye, sirloin, and filet mignon are known for their tenderness and flavor, making them ideal for grilling.
- Seasoning: Properly seasoning your steak enhances its natural flavors. Use a simple mix of salt and pepper, or marinate the steak for a few hours or overnight for deeper flavor infusion.
- Bring to Room Temperature: Allowing your steak to come to room temperature before grilling ensures even cooking. Take the steak out of the refrigerator about 30 minutes before grilling to avoid a cold center.
- Preheat the Grill: Preheating your gas grill is essential for searing the steak properly. Aim for a high temperature (around 450-500°F) to create a nice crust on the outside while keeping the inside juicy.
- Oil the Grill Grates: Preventing the steak from sticking is important for a clean flip and even cooking. Lightly oil the grill grates using a paper towel dipped in vegetable oil before placing the steak on the grill.
- Grilling Technique: Use direct heat for searing and indirect heat for cooking through. Start by searing the steak for a few minutes on each side, then move it to a cooler part of the grill to finish cooking to your desired doneness.
- Let it Rest: Resting the steak after grilling allows the juices to redistribute, resulting in a more flavorful and moist steak. Cover it loosely with foil and let it rest for about 5-10 minutes before slicing.
What Marinades Will Enhance the Flavor of Grilled Steaks?
Marinades play a crucial role in enhancing the flavor of grilled steaks, infusing them with depth and complexity. Here are some popular marinade options that elevate your steak game:
-
Classic Steak Marinade: Combine olive oil, balsamic vinegar, minced garlic, fresh rosemary, salt, and black pepper. This mixture tenderizes the meat while adding a rich, savory taste.
-
Teriyaki Marinade: Mix soy sauce, brown sugar, ginger, garlic, and sesame oil. This sweet and salty blend brings an Asian flair to your steak, perfect for those who enjoy a hint of sweetness.
-
Citrus Marinade: A combination of orange juice, lime juice, garlic, and chopped cilantro creates a refreshing and zesty marinade. The acidity helps break down the meat fibers, resulting in a tender steak.
-
Spicy Chipotle Marinade: Blend chipotle peppers in adobo sauce with lime juice, cumin, and honey for a smoky and spicy kick. This is ideal for those who appreciate bold flavors.
-
Wine Marinade: Use red wine, olive oil, garlic, and fresh thyme to enrich the steak with a robust flavor profile. The tannins in the wine help tenderize the meat, while the herbs provide aromatic depth.
Allow your steak to marinate for at least 30 minutes, but up to 6 hours for maximum flavor absorption. Choose a marinade that complements the type of steak you’re grilling for the best results.
Why is Proper Seasoning Crucial for Perfectly Grilled Steaks?
The underlying mechanism involves osmotic processes and chemical reactions. When salt is applied to steak, it breaks down proteins and extracts moisture, which then mixes with the seasoning. As the steak cooks on the gas grill, the high heat causes the surface to sear, forming a crust that locks in juices. This crust not only adds texture but also significantly contributes to the flavor profile through the caramelization of sugars and browning of proteins, which enhances the sensory experience of the best grilled steaks on a gas grill.
What Techniques Ensure Your Steak is Perfectly Grilled?
To achieve the best grilled steaks on a gas grill, several techniques can be employed:
- Choosing the Right Cut: Selecting the right cut of meat is crucial for flavor and tenderness. Cuts like ribeye, filet mignon, and New York strip are known for their marbling and juiciness, which enhance the grilling experience.
- Marinating: Marinating your steak for several hours or overnight can infuse it with flavor and help to tenderize the meat. A marinade typically includes an acid (like vinegar or citrus), oil, and various spices, which can complement the natural flavors of the steak.
- Preheating the Grill: Ensuring your gas grill is preheated to a high temperature before placing the steak on it is essential. This creates a nice sear on the steak, locking in juices and flavor while also providing those appealing grill marks.
- Using the Two-Zone Cooking Method: Setting up your gas grill with two zones – one for direct heat and one for indirect heat – allows for better control over cooking. Searing the steak on the hot side first and then moving it to the cooler side helps achieve a perfect crust while cooking it evenly to your desired doneness.
- Flipping Sparingly: It’s best to only flip your steak once during grilling to allow a proper crust to develop. Frequent flipping can prevent the Maillard reaction, which gives grilled meat its delicious flavor and texture.
- Monitoring Internal Temperature: Using a meat thermometer to check the internal temperature of the steak is crucial for achieving the perfect doneness. Different levels of doneness require specific temperatures, such as 130°F for medium-rare and 160°F for medium.
- Resting the Steak: After grilling, allowing the steak to rest for 5-10 minutes before cutting into it helps redistribute the juices throughout the meat. This results in a more flavorful and tender steak when served.
How Can You Achieve Ideal Grill Marks on Your Steak?
To achieve ideal grill marks on your steak, it’s essential to follow a few key techniques and tips.
- Preheat the Grill: Ensuring your gas grill is properly preheated is crucial for achieving those coveted grill marks.
- Oil the Steak: Applying oil to the steak helps prevent it from sticking to the grates and promotes even cooking.
- Use the Right Temperature: Cooking at the correct temperature ensures that the exterior of the steak sears quickly, creating beautiful grill marks.
- Positioning on the Grill: Placing the steak at an angle on the grates will create distinctive cross-hatch grill marks.
- Do Not Flip Too Early: Allowing the steak to sear properly before flipping helps form a crust and enhances the grill marks.
- Use a Meat Thermometer: To achieve the perfect doneness while maintaining great grill marks, a meat thermometer will help you monitor the internal temperature.
Preheating the grill to a high temperature is essential because it ensures that the grates are hot enough to create a sear on the steak. Aim for a temperature of around 450°F to 500°F before placing the meat on the grill.
Oiling the steak not only prevents sticking but also helps in achieving a better sear. Use a high smoke point oil, such as canola or avocado oil, to coat the steak lightly before grilling.
The right cooking temperature is critical; too low, and the steak will cook slowly without browning, while too high can burn the exterior before the inside is cooked. Searing at the right temperature allows for a flavorful crust to develop.
For grill marks, position the steak at a 45-degree angle on the grates, which will help create those characteristic cross-hatch patterns. After a couple of minutes, rotate the steak 90 degrees for an even more defined mark.
Resisting the urge to flip the steak too early is important, as it needs time to develop a good sear. Letting it cook undisturbed for the right amount of time will enhance both flavor and texture.
A meat thermometer is a valuable tool to ensure your steak is cooked to the desired temperature without losing those perfect grill marks. This will allow you to achieve the perfect doneness while maintaining the integrity of your grill marks.
What Temperatures Should You Aim for When Grilling Different Steak Cuts?
The ideal temperatures for grilling different steak cuts vary based on the desired doneness and the specific cut of meat.
- Filet Mignon: Aim for a grill temperature of 450-500°F for this tender cut.
- Ribeye: Aiming for a temperature of 425-450°F will yield a juicy ribeye with a nice sear.
- New York Strip: Grill at 450-500°F to achieve a perfect crust while keeping the inside tender.
- T-Bone: For optimal results, target a temperature of 450-500°F to ensure both sides are evenly cooked.
- Flank Steak: A high heat of 500-550°F is best for flank steak to quickly sear the outside while keeping it flavorful and juicy.
- Skirt Steak: Similar to flank, grill skirt steak at 500-550°F for a quick cook that enhances its flavor.
- Sirloin: Aim for a medium-high heat of 400-450°F for sirloin to obtain a good sear while ensuring it remains tender.
Filet Mignon is known for its buttery tenderness and is best cooked quickly at high temperatures to preserve its texture and flavor. A grill temperature of 450-500°F allows the exterior to sear beautifully while keeping the inside medium-rare, which is ideal for this cut.
Ribeye steaks are marbled with fat, making them flavorful and juicy. Grilling at 425-450°F provides enough heat to melt the fat and create a delicious crust without overcooking the steak.
The New York Strip has a robust flavor and a firm texture. Grilling it at 450-500°F helps achieve a satisfying crust while ensuring the center remains tender and juicy, suitable for those who prefer their steak medium-rare to medium.
T-Bone steaks, which feature both tenderloin and strip steak, benefit from cooking at high temperatures. Targeting 450-500°F ensures that both sides are cooked evenly, allowing for a delightful balance of flavors from each cut.
Flank steak is lean and best grilled at 500-550°F to create a nice crust quickly without drying it out. This high heat seals in the juices and enhances the meat’s natural flavors.
Skirt steak, known for its rich flavor and fibrous texture, also requires high heat between 500-550°F. This allows for a quick sear, which locks in moisture and maximizes taste, making it ideal for fajitas or other dishes.
Sirloin steaks are versatile and can be grilled at a medium-high heat of 400-450°F. This temperature allows for a good sear while still being gentle enough to keep the steak tender, making it a popular choice for many grilling enthusiasts.
How Can You Determine When Your Steak is Done Grilling?
To determine when your steak is done grilling, you can use several methods, each effective in ensuring that your steak reaches the perfect level of doneness.
- Meat Thermometer: Using a meat thermometer is one of the most reliable methods to check steak doneness. Insert the thermometer into the thickest part of the steak, avoiding bone or fat, and refer to the recommended internal temperatures for your desired doneness: 130°F for medium-rare, 140°F for medium, and 160°F for well-done.
- Touch Test: The touch test involves using your fingers to gauge the firmness of the steak. Gently press the center of the steak with your finger; a soft feel indicates rare, slightly firmer is medium-rare, and a firm touch signifies well-done steak.
- Color of Juices: Observing the color of the juices that run from the steak can also indicate its doneness. If the juices are red or pink, the steak is likely rare to medium-rare, while clear juices indicate that the steak is well-done.
- Cooking Time: Keeping track of cooking time based on the thickness of the steak can provide a general guideline. Typically, a 1-inch steak takes about 4-5 minutes per side for medium-rare on a gas grill; however, this can vary based on grill temperature and other factors.
- Visual Cues: Look for visual changes in the steak’s surface. A well-grilled steak will develop a brown crust and the juices will begin to pool on the surface as it nears doneness, indicating that it’s time to check other methods for confirmation.
What Are the Most Accurate Methods for Checking Steak Doneness?
The most accurate methods for checking steak doneness include:
- Meat Thermometer: A meat thermometer is a reliable tool that measures the internal temperature of the steak, providing precise doneness readings.
- Touch Test: The touch test involves using your fingers to feel the firmness of the steak, which correlates with different levels of doneness.
- Visual Cues: Observing the color and juices of the steak can give an indication of its doneness without needing any tools.
- Timer Method: Using a timer based on thickness and desired doneness can help achieve consistent results when grilling steaks.
Meat Thermometer: A meat thermometer is considered one of the most accurate methods for checking steak doneness. Insert the probe into the thickest part of the steak, avoiding bones or fat, and check the internal temperature; for medium-rare, it should be around 130-135°F, while for medium, it’s about 140-145°F. This method ensures that you achieve the perfect doneness every time, minimizing the risk of undercooking or overcooking.
Touch Test: The touch test is a handy technique that allows you to gauge doneness without any tools. By comparing the firmness of the steak to the firmness of the fleshy part of your hand when touching your thumb to different fingers, you can estimate whether the steak is rare, medium, or well-done. This method requires practice to master but can be very effective once you get the hang of it.
Visual Cues: Visual cues involve observing the steak’s appearance, including color and juice flow, to determine doneness. A rare steak will be red and cool in the center, while a medium steak will have a warm pink center, and a well-done steak will be brown throughout. Additionally, the juices will be clearer as the doneness increases, providing a visual indication of how cooked the steak is.
Timer Method: The timer method is a simple approach that involves timing the steak based on its thickness and the desired doneness. Generally, a 1-inch steak takes about 4-5 minutes per side for medium-rare on a gas grill. This method can vary based on grill temperature and steak thickness, so it’s best used in combination with other methods for accuracy.
How Important is Resting Time After Grilling for Steak Quality?
Resting time is crucial for achieving the best grilled steaks on a gas grill, as it significantly impacts the texture and flavor of the meat.
- Juice Redistribution: Resting allows the juices within the steak to redistribute evenly throughout the meat. When a steak is cooked, the heat forces the juices towards the center; allowing it to rest helps these juices to move back out to the surface, resulting in a more flavorful and moist steak.
- Tenderness Improvement: The process of resting helps to break down the muscle fibers in the steak, making it more tender. As the meat cools slightly, the fibers relax, which can enhance the overall eating experience by reducing chewiness.
- Temperature Stabilization: Resting time enables the temperature of the steak to stabilize, preventing it from continuing to cook excessively. This is particularly important when grilling on a gas grill, where the heat can be intense; resting helps to avoid overcooking the outer layers while the inner part reaches the desired doneness.
- Flavor Concentration: During resting, the flavors in the steak can intensify. The brief cooling period allows the seasoning and natural flavors to meld, resulting in a more robust taste when the steak is finally sliced and served.
- Presentation Quality: Allowing the steak to rest can improve its presentation when served. A properly rested steak can be sliced cleanly, providing a more appealing look and allowing diners to appreciate the juicy, tender texture.
What Common Mistakes Should You Avoid When Grilling Steaks?
When aiming for the best grilled steaks on a gas grill, avoiding common mistakes can significantly enhance your cooking results.
- Not Preheating the Grill: Many forget to preheat their gas grill, which is crucial for achieving a good sear. A hot grill ensures that the steak develops a flavorful crust while keeping the inside juicy and tender.
- Skipping the Seasoning: Some cooks neglect to season their steaks adequately, relying on the meat’s natural flavor. A generous amount of salt and pepper, or a marinade, enhances the steak’s taste and can create a delicious crust when grilled.
- Flipping Steaks Too Often: Constantly flipping steaks can prevent proper searing and lead to uneven cooking. Allowing the steak to sear on one side before flipping helps lock in juices and develop a better flavor profile.
- Using the Wrong Temperature: Cooking steaks at too low of a temperature can lead to overcooked meat that’s tough and dry. It’s best to use high heat for a short duration, allowing for a perfect medium-rare or desired doneness while maintaining juiciness.
- Not Letting the Steak Rest: Cutting into a steak immediately after grilling can cause juices to escape, leading to a dry bite. Allowing the steak to rest for several minutes helps redistribute the juices, resulting in a moist and flavorful steak.
- Ignoring Carryover Cooking: Many overlook that steaks continue to cook slightly after being removed from the grill due to residual heat. It’s essential to account for this carryover cooking when determining when to take the steak off the grill to achieve your desired doneness.
Why Can Overcooking Ruin Your Grilled Steak?
According to the USDA, the ideal internal temperature for most cuts of steak is around 135°F to 145°F for medium-rare to medium. Beyond these temperatures, the proteins in the meat begin to denature and coagulate, causing the steak to lose its natural juices and become tough and dry (USDA, 2021). This moisture loss is exacerbated by the high heat of a gas grill, which can quickly sear the exterior while leaving the interior overcooked.
The underlying mechanism involves the Maillard reaction and the breakdown of muscle fibers. As steak cooks, it undergoes a series of chemical reactions that enhance its flavor and color, known as the Maillard reaction, which occurs between amino acids and reducing sugars. However, if the steak is left on the grill too long, these beneficial reactions will plateau and eventually lead to burnt or charred surfaces, while also causing the muscle fibers to contract excessively. This extreme contraction not only pushes out juices but also alters the texture, making the steak chewy and less palatable.
What Happens if You Don’t Let Your Steak Rest Before Slicing?
Letting your steak rest before slicing is a crucial step that significantly impacts its texture and flavor. When a steak is grilled, its juices are driven to the surface due to the intense heat. Slicing immediately after cooking can result in a significant loss of these flavorful juices, leading to a dry and less appetizing piece of meat.
Here’s what happens when you skip the resting period:
-
Juice Redistribution: Resting allows the juices, which have migrated to the outer layers during cooking, to evenly redistribute throughout the meat. This ensures that each bite is moist and flavorful.
-
Improved Texture: Cutting immediately can result in a chewy steak. Resting allows the muscle fibers to relax, leading to a tenderer texture.
-
Flavor Concentration: The resting period allows flavors to mellow and concentrate, enhancing the overall taste profile.
For optimal results, let your steak rest for about 5 to 10 minutes after grilling. A simple rule is to cover it loosely with aluminum foil, which keeps the heat in while allowing moisture to settle. This small step can make a significant difference in your grilled steak experience.
Related Post: