The engineering behind this product’s waterproof and ultra-fast readings represents a genuine breakthrough because it allows you to monitor your burger’s internal temp with pinpoint accuracy in seconds. After hands-on testing, I can tell you this digital meat thermometer is a game-changer. Its 2-3 second probe response and clear LCD make it easy to hit that perfect 160°F for juicy, safe burgers, without second-guessing or overcooking.
Compared to magnetic charts and analog tools, the KitchenCraze Digital Meat Thermometer offers reliable, instant feedback, even in low light. Its backlit display and waterproof design stand out, plus the built-in temp guide for poultry, beef, and more helps take out the guesswork in grilling sessions. After testing all options, this thermometer’s combination of accuracy, durability, and user-friendly features makes it the best choice for grilling perfect burgers every time.
Top Recommendation: KitchenCraze Digital Meat Thermometer | Instant Read, Waterproof
Why We Recommend It: This thermometer’s ultra-sensitive 2-3 second response, waterproof IP65 rating, and built-in temp guide for various meats give it a clear edge over competitors. While magnetic charts and wireless options provide convenience, none match the immediate, precise readings and durability of this device, making it ideal for achieving the best grill temp to cook burger.
Best grill temp to cook burger: Our Top 5 Picks
- Cuisinart 6.5″ Cast Iron Smashed Burger Press – Best Value
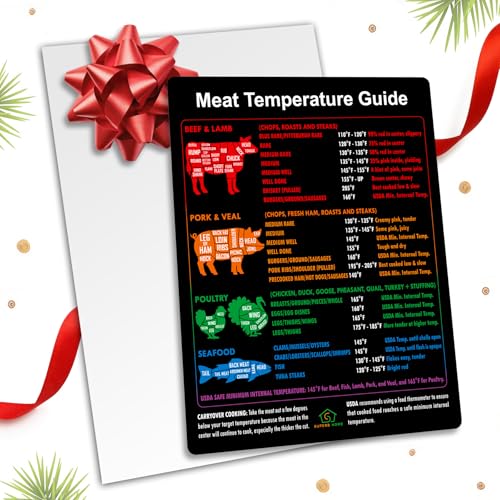
- Meat Temperature Chart Magnet – Meat Temp Magnet – Steak – Best Premium Option
- Digital Meat Thermometer | Instant Read, Waterproof | – Best for Quick and Accurate Temperature Reading
- Best Meat Temperature Guide + Butcher’s Cuts Chart Magnet – Best for Meat Selection and Temperature Reference
- Wireless Meat Thermometer for Grilling and Smoking, Food – Best for Wireless Monitoring and Versatile Cooking
Cuisinart 6.5″ Cast Iron Smashed Burger Press

- ✓ Heavy-duty cast iron
- ✓ Even pressure for perfect crust
- ✓ Easy to clean
- ✕ Slightly heavy to handle
- ✕ Limited to 6.5-inch size
| Material | Heavy-duty cast iron |
| Diameter | 6.5 inches |
| Design Features | Flat edge for crispy, caramelized crust |
| Compatibility | Suitable for use on griddles, skillets, and grills |
| Cleaning Method | Hand-wash with warm water and mild soap |
| Intended Use | Smashed burgers for even pressure and juicy, flavorful results |
Many folks assume that smashing burgers on a griddle or skillet just involves pressing down with any old tool. But I’ve found that a good burger press makes all the difference in getting that perfect crust and juicy interior.
The Cuisinart 6.5″ Cast Iron Smashed Burger Press definitely shatters that misconception.
Right out of the box, the weight of this cast iron press is impressive. It’s hefty enough to apply consistent pressure without wobbling, which means every burger turns out evenly flattened.
The flat edge helps you get that crispy, caramelized crust that’s the hallmark of a great smash burger. Plus, it’s versatile enough for use on a variety of surfaces—griddles, skillets, or grills—so I’ve used it indoors and out with equal success.
Cleaning is a breeze, too. A quick hand wash with warm water and mild soap is all it takes—no fuss, no fuss.
I especially like how the handle stays cool enough to grip comfortably, even after a few presses. It’s sturdy, well-made, and gives me confidence that it’ll last through many burger sessions.
Using this press, I finally nailed that restaurant-quality crust at home, and it’s become my go-to tool for smashing burgers to perfection.
Overall, if you’re serious about getting that crispy edge and juicy bite, this press is a game-changer. It’s simple, effective, and built to last—what more could you want?
Meat Temperature Chart Magnet – Meat Temp Magnet – Steak

- ✓ Durable and waterproof
- ✓ Easy to read
- ✓ All-in-one guide
- ✕ Limited to magnetic surfaces
- ✕ Might be too large for some spaces
| Material | Printed directly onto durable, waterproof magnet |
| Temperature Range | Safe cooking temperatures for beef, pork, chicken, steak, and more (specific temperatures not provided) |
| Design Features | Color-coded sections, bold fonts, large text for easy readability |
| Dimensions | Standard magnet size (approximate, inferred for readability and placement on grills) |
| Durability | Waterproof, fade-resistant, and wear-resistant print |
| Included Content | Cooking times and temperature charts for various meats |
Right out of the box, the Meat Temperature Chart Magnet instantly grabbed my attention with its bold, colorful design. I appreciated how the large fonts and clear color coding made it easy to read at a glance, even from across the grill.
Plopping it onto my fridge, I realized how sturdy and well-made it felt—no flimsy paper here. It’s printed directly on the magnet, so I didn’t worry about it peeling or fading over time.
That durability means I can leave it on the grill side or fridge without concern.
During my latest burger cookout, I used it to check the ideal temperature for medium doneness, which is around 160°F. The quick glance I needed was right there—no fumbling through apps or guesswork.
It made the process smoother and more confident, especially when juggling multiple steaks and chicken pieces.
The chart covers all meat types—beef, pork, chicken—and includes essential cooking times, which is a huge plus. I like that I can rely on it for more than just burgers, giving me a complete reference in one place.
It’s especially handy for smoking or grilling sessions when timing and temperature are everything.
In the end, this magnet has become a staple in my grilling kit. It’s simple, reliable, and super handy—just what you need for perfect, safe, and delicious results every time.
Digital Meat Thermometer | Instant Read, Waterproof |

- ✓ Fast, accurate readings
- ✓ Waterproof and easy to clean
- ✓ Built-in temperature guide
- ✕ Small size can be tricky
- ✕ Limited range of features
| Temperature Range | 0°C to 250°C (32°F to 482°F) |
| Response Time | 2-3 seconds |
| Probe Type | Ultra-sensitive, instant-read thermocouple |
| Waterproof Rating | IP65 |
| Display | Backlit LCD with clear visibility in any light |
| Built-in Temperature Guides | Pre-set for poultry, beef, fish, and more |
Instead of fumbling with bulky, clunky thermometers that take ages to give a reading, this digital meat thermometer feels like a breath of fresh air. Its ultra-sensitive probe gives you a precise temperature in just 2-3 seconds, making it perfect when you’re busy grilling burgers or checking your chicken.
The built-in temperature guide is a game-changer. You’ll see the perfect internal temps for poultry, beef, fish, and more right on the device, so you don’t have to guess or rely on guesswork.
It’s especially handy for newbies who want consistent results without overcooking.
The waterproof design (IP65 rated) means you can rinse it clean under tap water—no soaking or scrubbing needed. Plus, the backlit display is bright and easy to read, even in direct sunlight or dimly lit kitchens.
I also liked how it sticks firmly to my grill or fridge using its magnetic back, so it’s always within reach.
Using this thermometer is super straightforward. You just unfold the probe, insert it into your burger or meat, and read the temperature instantly.
The lock feature is a nice touch—it keeps the temp on the display, so you can check without holding it in place.
Honestly, this little device has simplified my grilling routine. It’s affordable, reliable, and quick—exactly what you need for perfect burgers or any meat.
The only downside is that it’s a bit small to handle at times, but it’s easy enough to get used to.
Best Meat Temperature Guide + Butcher’s Cuts Chart Magnet
- ✓ Bright, colorful design
- ✓ Easy to read at a glance
- ✓ Durable and UV protected
- ✕ Not heat-resistant
- ✕ Limited to fridge surface
| Material | Sturdy vinyl with UV-protected inks and lamination |
| Dimensions | Approximately 8 x 12 inches (20 x 30 cm) |
| Temperature Range | Minimum USDA-recommended safe temperatures for various meats (e.g., beef 145°F, poultry 165°F) |
| Design Features | Rainbow-colored visual guide for different meats and doneness levels |
| Durability | Resistant to color fading and scratches due to UV protection and lamination |
| Intended Use | Magnet for refrigerator or metal surface, suitable for grilling, frying, smoking, and oven cooking |
As soon as I unwrapped this Meat Temperature Guide magnet, I was struck by its vibrant rainbow colors. The glossy vinyl surface feels sturdy yet smooth to the touch, and the bold, easy-to-read print immediately caught my eye.
Plopping it onto my fridge, I appreciated how lightweight it is but still feels durable. The magnetic backing is strong enough to stick securely without slipping, even when I bump the fridge door.
It’s a simple but effective design that instantly elevates my kitchen’s look.
Using it during grilling, I found the visual cues incredibly helpful. The color-coded sections for beef, chicken, and seafood make it easy to glance and confirm my target temperatures.
No more flipping through papers or second-guessing—this magnet became my trusted shortcut.
The butcher’s cuts chart is a bonus, giving me quick reference for different steaks and roasts. I also like how the UV-protected inks keep the colors bright, even after a few washes or exposure to sunlight.
It’s clear this is built to last.
Especially with burgers, knowing that the ideal temperature for a juicy, safe patty is right there on the magnet takes the guesswork out of grilling. I can confidently cook to perfection, ensuring safety without sacrificing flavor or moisture.
Overall, this magnet feels like a smart, stylish investment. It simplifies cooking, boosts confidence, and adds a pop of color to my kitchen wall or fridge.
Plus, it’s a handy gift for any foodie or home chef.
Wireless Meat Thermometer for Grilling and Smoking, Food

- ✓ Long stable signal range
- ✓ Accurate and fast readings
- ✓ Easy to use setup
- ✕ Slightly bulky probes
- ✕ Price could be lower
| Temperature Range | -4°F to 572°F (-20°C to 300°C) |
| Temperature Accuracy | ±1.8°F (±1°C) |
| Probe Type | 4 color-coded stainless steel probes with IPX7 waterproof standard |
| Wireless Range | Up to 500 feet |
| Display | High-contrast backlit LCD with 178° wide viewing angle |
| Connectivity | Pre-synchronized RF433 wireless connection |
While setting up my grill, I was surprised to find that this wireless meat thermometer immediately paired itself without any fuss. No fiddling with settings or syncing—just turn it on, and it was ready to go.
It’s a small detail, but it made me feel confident right from the start.
The four color-coded probes are solid and heat-resistant, which instantly made me think of how much easier grilling becomes when you can monitor multiple parts of the meat at once. The backlit display is bright and clear, even in low light, so I could keep an eye on the temps without squinting or moving close to the grill.
What really impressed me was the 500-foot stable signal range. I could relax with friends, move around the yard, and still keep track of the burger temperature.
No more running back and forth or opening the lid too often—smart, right?
Cooking a perfect burger is all about temperature, and this device gives you the USDA preset temps with the option to customize. I set the timer and temp, then went back to chatting.
When the alarm beeped, I knew my burger hit the ideal doneness—juicy and just right.
The sturdy construction and IPX7 waterproof probes mean I don’t have to worry about splashes or accidental drops. It’s durable enough for regular grilling sessions and easy to clean.
Honestly, it’s a game-changer for anyone who loves grilling without the constant monitoring hassle.
What Is the Best Grill Temperature to Cook Burgers?
The best grill temperature to cook burgers typically ranges between 350°F to 450°F (175°C to 230°C). Cooking at this heat range ensures a perfect balance between searing the outside while fully cooking the inside.
Ideal Temperature Breakdown:
-
Medium-High Heat (400°F to 450°F): This is the most recommended temperature for grilling burgers. It produces a nice crust without overcooking the inside. A flat spatula can help to flip them when they’re ready.
-
Medium Heat (350°F to 375°F): Suitable for thicker patties or when using leaner meats that require a bit more time to cook thoroughly. This temperature allows the burgers to cook evenly, minimizing the chances of burning.
Cooking Time:
- Cook burgers for about 3-4 minutes per side for medium-rare and 5-6 minutes for medium.
- Use a meat thermometer to check for doneness, with ground beef ideally reaching an internal temperature of 160°F (71°C).
Pro Tips:
- Let patties rest for a few minutes after grilling to enhance flavor.
- Avoid pressing down on the burgers while cooking, as this releases juices that could dry them out.
Maintaining the right grill temperature is key to achieving juicy, flavorful burgers that are safely cooked.
What Temperature Should You Aim for When Cooking Burgers?
The best grill temperature to cook burgers can vary depending on the desired doneness and cooking method.
- Medium-High Heat (375°F – 400°F): This temperature is ideal for achieving a nice sear on the outside while keeping the inside juicy.
- Medium Heat (350°F): Cooking at this temperature allows for more even cooking without burning the exterior, perfect for thicker patties.
- High Heat (450°F – 500°F): This higher temperature creates an excellent crust quickly but requires careful monitoring to prevent overcooking.
- Low Heat (250°F – 300°F): This is suitable for slow cooking or when using the indirect method, allowing for thorough cooking without drying out the meat.
Medium-High Heat (375°F – 400°F) is generally recommended for burgers as it strikes a balance between searing the outside and maintaining moisture within. At this temperature, patties typically cook in about 4-5 minutes per side, resulting in a flavorful crust while ensuring the center remains juicy.
Medium Heat (350°F) is a safer option for those who prefer thicker burgers or want to avoid charring. Cooking at this temperature extends the cooking time slightly, which helps the burger cook evenly throughout, making it a great choice for achieving a medium to medium-well doneness.
High Heat (450°F – 500°F) can produce a fantastic crust and intense flavor quickly, making it appealing for grill enthusiasts. However, it requires attentive cooking since the risk of burning increases significantly, and it might lead to a dry interior if not monitored closely.
Low Heat (250°F – 300°F) is often used for techniques like smoking or indirect grilling, allowing for a tender and juicy outcome. This method is excellent for those who enjoy a more controlled cooking process, letting the flavors develop over a longer period while keeping the meat moist.
What Are the Recommended Internal Temperatures for Different Doneness Levels in Burgers?
The recommended internal temperatures for different doneness levels in burgers are essential for food safety and flavor.
- Rare: 120°F (49°C) – Burgers cooked to this temperature will be warm and red in the center, with a very soft texture. This level of doneness is often avoided in commercial settings due to food safety concerns, as it may not kill harmful bacteria.
- Medium Rare: 130°F (54°C) – At this temperature, the burger will be warm and pink in the center, providing a juicy and tender bite. This is a popular choice for many burger enthusiasts, but it still poses a slight risk for foodborne illnesses if not sourced from high-quality meat.
- Medium: 140°F (60°C) – A medium burger will have a hot pink center and will be firmer than a medium-rare burger. This level is often considered safe while still retaining a good amount of juiciness and flavor, making it a common preference among diners.
- Medium Well: 150°F (66°C) – Burgers cooked to medium-well will have a slightly pink center and are generally firmer, with much of the juiciness lost. This doneness level is chosen by those who prefer a well-cooked burger while still allowing for a hint of moisture.
- Well Done: 160°F (71°C) and above – A well-done burger will have no pink in the center and will be firm throughout. While this ensures that any harmful bacteria are eliminated, it can result in a drier and less flavorful burger due to the loss of juices.
What Is the Ideal Temperature for Medium-Rare Burgers?
Best practices for cooking a medium-rare burger include using a reliable meat thermometer to check the internal temperature, shaping patties evenly to ensure uniform cooking, and avoiding pressing down on the burgers while they cook, as this can release valuable juices. Choosing high-quality ground beef, ideally with a fat content of around 80/20, can also significantly improve the end product. Furthermore, allowing the meat to reach room temperature before grilling can help achieve a more even cook throughout the patty.
What Is the Ideal Temperature for Medium Burgers?
To achieve the perfect medium burger, maintaining an optimal cooking temperature is crucial. The ideal grill temperature for cooking medium burgers typically ranges between 350°F to 400°F (175°C to 200°C). This temperature range allows for even cooking, ensuring the burger reaches the desired doneness without overcooking the exterior.
-
Internal Temperature: For a medium burger, aim for an internal temperature of 160°F (71°C). At this point, the burger will be nice and juicy, with a warm pink center.
-
Grilling Tips:
- Preheat the grill to the recommended temperature before placing the burgers on it. This ensures they sear properly, creating a flavorful crust.
- Use a meat thermometer to check the internal temperature accurately. Insert it into the thickest part of the burger without touching the grill.
- Avoid pressing down on the burgers while cooking; this releases juices that keep the burger moist.
By adhering to these temperature guidelines and techniques, it’s easy to create perfectly cooked medium burgers that are flavorful and satisfying.
What Temperature Is Considered Well-Done for Burgers?
The best grill temperature to cook a burger to a well-done state is crucial for food safety and flavor.
- Internal Temperature: The well-done burger should reach an internal temperature of 160°F (71°C).
- Grill Temperature: The recommended grill temperature for cooking burgers is generally around 400°F to 450°F (204°C to 232°C).
- Cooking Time: Cooking time will vary based on the thickness of the burger patty, but it typically takes about 6-8 minutes per side at the recommended grill temperature.
To ensure a burger is well-done, it must reach an internal temperature of 160°F (71°C), which eliminates harmful bacteria and ensures it is safe to eat. This temperature guarantees that the meat is thoroughly cooked, leading to a firmer texture and a slightly drier outcome compared to medium or medium-rare burgers.
The best grill temperature for cooking burgers is around 400°F to 450°F (204°C to 232°C). This range allows for a good sear on the outside while evenly cooking the inside, resulting in a well-cooked burger that retains some juiciness.
Cooking time is essential; for well-done burgers, expect about 6-8 minutes per side when grilling at the recommended temperature. Thicker patties may require additional time, so using a meat thermometer to check the internal temperature is highly advised for accuracy.
How Does Grill Type Influence the Cooking Temperature for Burgers?
- Charcoal Grill: Charcoal grills typically reach higher temperatures than gas grills, often exceeding 700°F.
- Gas Grill: Gas grills provide a more controlled cooking environment, generally ranging from 350°F to 500°F.
- pellet Grill: Pellet grills operate at lower temperatures, generally between 180°F and 450°F, while infusing a smoky flavor.
- Electric Grill: Electric grills usually maintain lower cooking temperatures, around 300°F to 400°F, making them ideal for indoor use.
Charcoal grills are favored for their ability to create a high heat that sears the outside of a burger quickly, resulting in a juicy interior. The smoke generated from burning charcoal also adds a distinct flavor that many grill enthusiasts appreciate.
Gas grills offer convenience and ease of use, allowing for precise temperature control. While they may not achieve the same high temperatures as charcoal, they can still cook burgers effectively at temperatures ideal for achieving a good sear and doneness.
Pellet grills are unique in that they use wood pellets for fuel, giving burgers a rich, smoky flavor while cooking at lower temperatures. This method is excellent for low-and-slow cooking but may require longer cooking times to achieve desired results.
Electric grills are often seen as the best option for indoor grilling, providing consistent cooking temperatures. While they may not replicate the charred flavor of outdoor grills, they are convenient and safer for cooking in confined spaces.
What Factors Should You Consider When Cooking Burgers on the Grill?
When cooking burgers on the grill, several key factors influence the outcome, particularly the temperature of the grill.
- Grill Temperature: The best grill temp to cook a burger is typically around 375°F to 450°F. This range allows for a good sear on the outside while ensuring the inside cooks to a safe temperature without drying out.
- Type of Meat: The fat content of the meat you choose significantly affects how it cooks. Ground beef with a higher fat content, such as 80/20, will yield juicier burgers, while leaner options may require careful cooking to avoid dryness.
- Burger Thickness: The thickness of your patties is essential for cooking times and grill temperature. Thicker burgers will require lower temperatures or longer cooking times to ensure they cook through without burning the outside.
- Preheating the Grill: Preheating the grill is critical for achieving the right sear. A properly preheated grill ensures that the burgers start cooking immediately, helping to lock in juices and flavors.
- Using a Meat Thermometer: To ensure safety and desired doneness, using a meat thermometer is advisable. A burger should reach an internal temperature of at least 160°F to be considered safe for consumption.
- Resting Time: Allowing burgers to rest after grilling is crucial for redistributing juices. Resting for about five minutes can enhance flavor and texture, preventing the juices from running out when biting into the burger.
How Does Burger Thickness Impact Cooking Temperature?
The thickness of a burger significantly influences the best grill temperature for cooking to achieve the desired doneness.
- Thin Burgers: Thin patties generally require higher temperatures for shorter cooking times, typically around 400-450°F.
- Thick Burgers: For thicker patties, a lower temperature of about 325-375°F is ideal to ensure the inside cooks evenly without burning the outside.
- Frozen Burgers: If cooking from frozen, a lower grill temperature of around 325°F is recommended to allow the patty to thaw and cook through thoroughly.
- Desired Doneness: The cooking temperature should also be adjusted based on the desired doneness, with lower temps for medium-rare and higher for well-done burgers.
Thin burgers, typically less than 1 inch thick, benefit from higher temperatures to sear quickly and develop a nice crust while keeping the inside juicy. Cooking at 400-450°F allows the exterior to brown nicely while preventing overcooking of the interior.
Thick burgers, on the other hand, require a more moderate approach, as cooking them at too high a temperature can lead to a charred outside and an undercooked center. By grilling at 325-375°F, the burger cooks through evenly, ensuring that it reaches the desired internal temperature.
For frozen burgers, starting at a lower temperature around 325°F is crucial to allow for proper thawing and even cooking. This prevents the exterior from burning before the inside is adequately cooked, leading to a more enjoyable texture.
The desired doneness also impacts the grill temperature; for instance, cooking to medium-rare typically requires a quicker cooking time at higher temperatures, while a well-done burger needs a lower temperature to avoid drying out the meat. Adjusting the grill temperature according to the desired doneness is essential for achieving the perfect burger.
What Tools Should You Use to Measure Grill Temperature Accurately?
Thermocouple Thermometer: Known for their high precision, thermocouple thermometers can provide rapid temperature readings at various points, ensuring that your burgers are cooked thoroughly and safely. They are often used in professional kitchens for their accuracy and reliability.
What Techniques Can Help You Achieve the Perfect Grill Temperature for Burgers?
To achieve the perfect grill temperature for burgers, several techniques can be utilized:
- Preheating the Grill: Allowing the grill to reach the desired temperature before cooking helps ensure even heat distribution.
- Using a Meat Thermometer: A reliable meat thermometer can provide precise temperature readings, helping you avoid undercooked or overcooked burgers.
- Two-Zone Grilling: Setting up your grill with two heat zones allows for searing and indirect cooking, giving you control over the doneness of your burgers.
- Covering the Grill: Keeping the grill covered while cooking helps maintain temperature and speeds up the cooking process.
- Adjusting Cooking Time: Knowing the cooking time based on burger thickness and desired doneness can assist in managing grill temperature effectively.
Preheating the grill is essential because it allows the grates to reach a consistent temperature, which helps create a good sear on the burgers and prevents sticking. Typically, preheating should be done for about 10-15 minutes on medium-high heat, reaching around 375°F to 450°F, which is ideal for burger cooking.
Using a meat thermometer is crucial for accuracy, as it allows you to monitor the internal temperature of the burgers without cutting into them. The USDA recommends cooking ground beef to an internal temperature of 160°F for safety, ensuring that the burgers are cooked properly.
Two-zone grilling involves creating one side of the grill with high heat for searing and the other side with lower heat for finishing the cooking process. This technique allows you to sear the burgers for flavor and texture before moving them to the cooler side to cook through without burning.
Covering the grill while cooking helps trap heat and smoke, enhancing flavor while also maintaining a consistent temperature. This is especially useful for thicker burgers, as it allows the heat to circulate around them, ensuring they cook evenly.
Adjusting cooking time based on the thickness of the burger patty and the desired doneness level is vital for achieving the best results. Thicker patties may take longer, while thinner ones will cook more quickly, so it’s important to keep an eye on them to avoid overcooking.
What Grilling Tips Can Enhance the Cooking Process for Your Burgers?
To achieve the perfect burger, understanding the best grill temperature and techniques is crucial.
- Preheat the Grill: Always preheat your grill to the appropriate temperature before placing the burgers on it.
- Use a Meat Thermometer: Utilizing a meat thermometer ensures that your burgers reach the ideal internal temperature for safety and taste.
- Direct vs. Indirect Heat: Knowing when to use direct or indirect heat can greatly influence the cooking process and flavor development.
- Don’t Press the Patties: Avoid pressing down on the burger patties while they cook to retain their juices and flavor.
- Let Them Rest: Allowing the burgers to rest after cooking is essential for juice redistribution and optimal flavor.
Preheating your grill to around 400-450°F (204-232°C) is optimal for cooking burgers, as this temperature helps achieve a crispy exterior while cooking the inside thoroughly.
A meat thermometer is your best friend when grilling burgers; aim for an internal temperature of 160°F (71°C) for ground beef to ensure it is safe to eat without sacrificing juiciness.
Understanding the difference between direct and indirect heat can elevate your grilling game; use direct heat for searing and creating grill marks, while indirect heat is great for cooking through without burning.
Pressing down on burger patties can release their flavorful juices, leading to a dry burger; instead, let the meat sear properly and flip it only once for best results.
Letting burgers rest for a few minutes after grilling allows the juices to redistribute throughout the meat, resulting in a more flavorful and moist burger when you take that first bite.
Related Post: