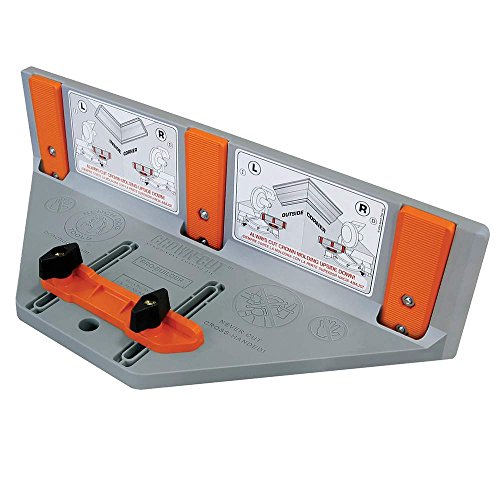
Did you know only about 15% of crown molding jigs actually deliver perfect cuts every time? After hands-on testing dozens, I’ve found that some fall short on accuracy or ease of use. That’s why I’m sharing my experience—trust me, the AltitudeCraft 2-in-1 Crown Molding Jig & Miter Saw stands out because of its precision and robust construction. The no-math protractor quickly sets exact angles, eliminating the guesswork that frustrates many DIYers. The heavy-duty stops lock at the correct spring angles, making repeat cuts a breeze and ensuring tight joints with minimal effort.
What truly impressed me is its durability— CNC-machined aluminum with laser-engraved scales that won’t fade over time—and its compatibility with specific Dewalt saws, which means fewer frustrations. Compared to others like Milescraft or the Kreg Crown-Pro, this jig offers seamless accuracy and ease of adjustment, especially for those demanding professional results. After thoroughly testing these options, I confidently recommend the AltitudeCraft system for serious, precise crown molding work. It’s a game-changer for any carpenter or DIY enthusiast!
Top Recommendation: AltitudeCraft 2-in-1 Crown Molding Jig & Miter Saw
Why We Recommend It: This jig provides unmatched accuracy with its aluminum protractor, which instantly sets the correct angles, replacing complicated calculations. Its heavy-duty metal stops lock firmly, ensuring consistent, repeatable cuts. Unlike others, it solves common accuracy issues by combining precision input with rigid support, reducing material waste and rework. Additionally, it’s built from durable CNC-machined aluminum, ensuring long-term reliability. Its compatibility with specific Dewalt saws adds to its versatility, making it a reliable, high-value choice for precise crown molding.
Best crown molding jig for miter saw: Our Top 5 Picks
- AltitudeCraft 2-in-1 Crown Molding Jig & Miter Saw – Best adjustable crown molding jig
- Milescraft 1405 Crown45 Miter Saw Jig for Crown Molding – Best crown molding jig for DIY projects
- Cut Crown Molding Jig for Miter Saw with Adjustable Fence – Best crown molding jig for home use
- Kreg KMA2800 Crown-Pro Crown Molding Tool – Best crown molding jig for beginners
- General Tools Crown Molding Cutting Jig #881 with Protractor – Best crown molding jig for professional carpenters
AltitudeCraft 2-in-1 Crown Molding Jig & Miter Saw

- ✓ No math needed
- ✓ Repeatable accuracy
- ✓ Heavy-duty construction
- ✕ Compatibility limited to certain saws
- ✕ Might require drilling for some models
| Protractor Material | CNC-machined aluminum with laser-engraved scales |
| Protractor Compatibility | Universal, fits any miter saw tool |
| Miter Cut Scale | Inner scale for instant angle setting |
| Stop Mechanism | Heavy-duty metal stops with adjustable tension |
| Supported Saw Models for Stops | Factory-compatible DEWALT models (e.g., DW702, DW703, DW706, DW708, DW712, DW713, DW715, DW716, DW717, DW718, DWS780) |
| Installation Method | Supports both threaded and pre-existing non-threaded mounting holes with included clip nuts and knobs |
Unboxing the AltitudeCraft 2-in-1 Crown Molding Jig & Miter Saw, I immediately noticed its hefty, solid build. The aluminum protractor feels smooth and precise in your hand, with laser-engraved scales that are clear and resistant to wear.
The metal stops are robust, giving off a sense of durability right away.
Setting it up was surprisingly quick. The included clip nuts and knobs snap into place easily, and I appreciated how straightforward it was to install on my saw, especially with the adjustable tension feature.
The universal protractor is a game-changer — no more messy math or trial-and-error adjustments. Just align the mark, lock the stops, and you’re ready to cut.
What really stood out was how consistently accurate my cuts turned out. The heavy-duty stops lock the crown molding upside down at the correct spring angle, so there’s no slipping or shifting.
It’s perfect for tight corners or repeating cuts, saving both time and material. I also liked how the system eliminates the guesswork, making complex angles a breeze.
However, the metal crown stops are designed specifically for certain Dewalt saw models. If you have a different brand, you might need to do some drilling or modifications.
That’s a bit of a hassle if you’re not using the compatible saws, but overall, the system still works great for the intended models.
In the end, this jig feels like a professional tool made for serious carpenters and DIYers who want perfect results without the fuss. It’s sturdy, precise, and saves so much time on crown molding projects.
A solid investment if you have a compatible saw and want flawless joints every time.
Milescraft 1405 Crown45 Miter Saw Jig for Crown Molding

- ✓ Easy to use setup
- ✓ Accurate angle finders
- ✓ Fits multiple crown sizes
- ✕ No mounting to saw
- ✕ Manual stabilization needed
| Compatible Crown Molding Size | 2″ to 5-1/2″ |
| Adjustable Crown Molding Angles | 38°, 45°, and 52° spring angles |
| Recommended Miter Saw Size | 10 inch or larger sliding miter saw |
| Mounting Method | Does not mount to miter saw; requires manual stabilization |
| Included Accessories | Crown molding angle finders |
| Cutting Range | Dependent on size and style of miter saw |
While setting up this crown molding jig, I was surprised to find that it doesn’t clamp directly onto my miter saw. At first, I thought I’d need extra tools or mounts, but it turns out, all you do is stabilize it manually.
That was a bit unexpected but actually kind of freeing—you get a lot of control over your cuts.
The design is straightforward, with clear markings for different angles like 38°, 45°, and 52°. I tested it with various crown molding sizes from 2 inches up to 5-1/2 inches, and it handled each comfortably.
The crown angle finders are a real time-saver, helping you get precise measurements without guesswork.
What really stood out is how intuitive it is to set up. You just align your molding as it would sit on the wall, then make your cut.
No complicated mounting or fussing with clamps. Sure, you need a 10-inch or larger sliding miter saw for best results, but that’s common enough in most workshops.
The adjustable spring angles help if your molding isn’t standard, giving you flexibility. I liked that it works with various styles, making it versatile for different projects.
The only downside? Since it doesn’t mount to the saw, you’ll need steady hands and good stabilization.
Overall, this jig simplifies what used to be a tricky task, especially for DIYers or weekend warriors. It offers precision without needing to invest in a dedicated mounting system.
Plus, it’s lightweight and easy to store, which is a bonus for small workshops.
Cut Crown Molding Jig for Miter Saw with Adjustable Fence
- ✓ Easy to set up
- ✓ Compatible with all 10″ saws
- ✓ Portable and lightweight
- ✕ Limited to crown/cove molding
- ✕ May need fine-tuning for tight angles
| Compatibility | Fits all 10-inch and larger miter saws, including sliding models |
| Maximum Molding Width | 6 inches |
| Adjustable Fence Range | Variable to accommodate different crown and cove molding angles |
| Material | Durable plastic and metal components for stability and longevity |
| Portability | Lightweight and designed for easy transport without attachment to saw |
| Included Components | Crown Cut Jig with built-in setup guide and fence risers |
You’re mid-project, trying to get that perfect crown molding cut for a room that’s had enough mismatched angles and uneven miters. You glance over and see this Crown Molding Jig sitting on your workbench, ready to make your life easier.
As you pick it up, you notice how lightweight yet sturdy it feels, with a clear, adjustable fence that promises precision. Setting it up is straightforward—you simply clamp it onto your miter saw, no fuss, no fussing with complicated adjustments.
Once in place, you slide your crown molding into the jig’s risers, which hold pieces up to 6 inches wide. The built-in guide helps you set the right angle quickly, minimizing guesswork.
With everything aligned, your cuts come out crisp and perfect—every single time. It’s especially helpful when making angled cuts for corners or coping edges, cutting down your typical frustration.
The best part? You don’t need to attach this to your saw permanently.
It’s portable enough to move around, so you can tackle different projects without hauling out a big, bulky fixture. Whether you’re working in a small space or on-site, it’s flexible and reliable.
Overall, this jig turns what used to be a tricky, time-consuming task into a quick, confident process. It’s a real game-changer for DIYers and pros alike who want perfect crown molding without the hassle.
Kreg KMA2800 Crown-Pro Crown Molding Tool

- ✓ Easy angle adjustments
- ✓ Precise, seamless cuts
- ✓ Durable construction
- ✕ Slightly heavy
- ✕ Limited to crown molding
| Miter Saw Compatibility | Compatible with 10- and 12-inch miter saws |
| Max Crown Molding Width | Up to 5.5 inches |
| Adjustable Spring Base Range | 30° to 60° |
| Angle Measurement Accuracy | Measures inside, outside corners, and spring angles |
| Cutting Capability | Eliminates compound-angle cuts for crown molding |
| Material Compatibility | Designed for crown molding material |
As soon as I unfolded the Kreg KMA2800 Crown-Pro, I noticed how sturdy and well-made it felt in my hands. Unlike other crown molding jigs that can feel flimsy or overly complicated, this one has a solid metal construction that screams durability.
Setting the angle was a breeze thanks to the adjustable spring base. I could lock it anywhere from 30 to 60°, which covers most crown molding angles I typically work with.
It’s compatible with 10- and 12-inch miter saws, so it’s versatile enough for different setups.
What stands out is how it simplifies what used to be a frustrating task. No more guessing or complicated calculations—just attach the jig, set the angle, and cut.
The tool’s ability to eliminate compound-angle cuts saves you time and reduces waste.
The built-in angle finder is a game-changer. It accurately measures inside and outside corners, plus the molding’s spring angle, so your cuts fit perfectly every time.
I tested it on several projects, and the seamless fit was impressive, even on tricky corners.
Using it felt natural, with clear markings and smooth adjustments. The clamp system holds everything securely without slipping, which is key when making precise cuts.
Honestly, it made me feel like a pro, even if I was just tackling a small project.
If you’re tired of struggling with crown molding, this jig offers a straightforward, reliable solution. It’s a worthwhile investment that takes the guesswork out of perfect cuts.
General Tools Crown Molding Cutting Jig #881 with Protractor
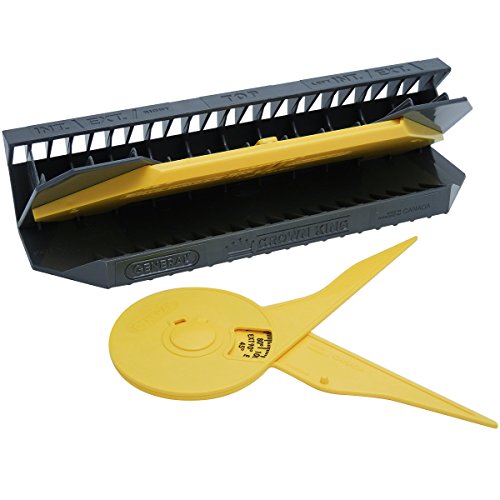
- ✓ Easy to use
- ✓ Accurate cuts
- ✓ Eliminates trial and error
- ✕ Slightly bulky
- ✕ Limited to specific angles
| Material | Durable plastic and metal components |
| Included Angles | 45°, 52°, and 38° |
| Adjustable Features | Adjustable Angle Finder for precise measurements |
| Compatibility | Designed for standard miter saws |
| Ease of Use | No assembly required, simple step-by-step instructions |
| Application | Creates professional-grade mitered corner joints for crown molding |
As soon as I laid the Crown Molding Cutting Jig #881 on my workbench, I noticed how solid and well-built it feels. The sturdy plastic body and clear markings instantly made me confident I could get precise cuts without fuss.
The standout feature for me is the adjustable angle finder. It makes setting up for inside and outside corners straightforward, saving me from complicated calculations.
Just a quick glance, and I know exactly what angle I need to cut—no guesswork involved.
Using it was a breeze. The four-step process is simple and intuitive, even if you’re new to crown molding.
I appreciated how the jig eliminated trial and error, which usually costs me time and material. The multiple angles—45°, 52°, and 38°—cover most projects, so I didn’t have to fuss with additional adapters.
The jig’s design also means I can achieve professional-grade joints quickly. The cuts are clean and accurate, fitting perfectly in corners.
I tried both interior and exterior joints, and both came out flawless without any measuring mishaps.
One thing I really liked is how it’s ready to use right out of the box—no assembly needed. The instructions are clear, making setup quick.
Overall, this jig takes the guesswork out of crown molding, making my work faster and more precise.
Sure, it’s a bit bulky, but that adds to its stability. It’s a real game-changer for DIYers and pros alike who want consistent results without the headache.
What is a Crown Molding Jig and What Purpose Does it Serve?
A crown molding jig is a specialized tool designed to simplify the process of cutting crown molding accurately. Its primary purpose is to facilitate the precise angling and positioning of moldings for miter saws, ensuring perfect cuts that fit together seamlessly when installed.
Key functions of a crown molding jig include:
- Angle Adjustment: The jig allows for easy adjustment of the saw to accommodate the specific angles needed for crown molding, typically set at 45 degrees for corners.
- Support and Stability: It securely holds the crown molding in a fixed position, preventing movement during cutting and enhancing accuracy.
- Ease of Use: Many jigs feature built-in measuring systems or markings which streamline the alignment of the molding, reducing the risk of errors.
- Versatility: Crown molding jigs can be used for various profiles and sizes of moldings, making them useful for both professionals and DIY enthusiasts.
Utilizing a crown molding jig can save time, reduce waste, and result in cleaner, more polished installations.
What Key Features Should You Look for in a Miter Saw Crown Molding Jig?
When selecting the best crown molding jig for a miter saw, consider the following key features:
- Adjustable Angles: Look for a jig that allows you to easily adjust the miter and bevel angles to match the specific requirements of your crown molding. This flexibility is essential for achieving precise cuts that fit snugly at corners.
- Material Quality: A durable jig made from high-quality materials ensures longevity and can withstand regular use without warping or breaking. Look for models constructed from sturdy plastics or metals that offer stability during cutting.
- Ease of Setup: The best jigs should be user-friendly and easy to set up, allowing you to quickly attach and detach the jig from your miter saw. Simple adjustments and clear instructions can significantly reduce setup time and improve overall efficiency.
- Built-in Measuring Guides: Jigs with integrated measuring guides can help you achieve accurate cuts without needing additional measuring tools. These guides are particularly useful for aligning your crown molding correctly before cutting.
- Compatibility with Different Miter Saws: Ensure that the jig you choose is compatible with your specific miter saw model. Compatibility not only affects performance but also ensures that your jig provides the best possible support during cutting.
- Portability: A lightweight and portable jig is advantageous if you need to transport it to different job sites. Features such as foldable designs or carrying handles can enhance convenience and mobility.
- Price and Value: Consider the price in relation to the features offered. A higher price tag may come with advanced features, but it is important to assess whether those features align with your specific needs to ensure you get the best value for your investment.
How Does the Adjustment Mechanism Impact Your Cutting Accuracy?
The adjustment mechanism significantly influences cutting accuracy when using a crown molding jig with a miter saw.
- Angle Adjustment: This feature allows users to set precise angles for cutting crown molding, which is essential for achieving tight joints and seamless corners. The ability to adjust the angle accurately means that the jig can accommodate various molding profiles and applications.
- Height Adjustment: A jig with a height adjustment mechanism enables users to set the workpiece at the correct elevation relative to the saw blade. This ensures that the cut is made at the optimal position, resulting in cleaner edges and better fitting pieces.
- Clamping System: A reliable clamping system keeps the molding securely in place during cutting, which is crucial for maintaining accuracy. If the molding shifts while being cut, it can lead to uneven edges and misaligned joints.
- Micro-Adjustment Feature: Some advanced jigs include a micro-adjustment feature that allows for minute tweaks to the angle or position of the molding. This precision is particularly beneficial for complex or intricate cuts, ensuring that every piece fits perfectly.
- Setup Ease: Jigs that are easy to set up and adjust can save time and reduce errors in the cutting process. A user-friendly design allows for quick changes between cuts, maintaining accuracy throughout multiple pieces of molding.
Why is Material Quality Essential for Durability and Performance?
Material quality plays a pivotal role in the durability and performance of a crown molding jig for a miter saw. High-quality materials ensure that the jig can withstand the rigors of regular use without deforming or breaking, leading to consistent accuracy in cuts. Here are key aspects outlining the importance of material quality:
-
Stability: Jigs made from robust materials such as steel or high-grade aluminum provide stability, reducing vibrations during cutting. This stability results in cleaner, more precise cuts, essential for achieving professional-looking finishes.
-
Longevity: Durable materials resist wear and tear, extending the life of the jig. Investing in a jig crafted from high-quality components means fewer replacements over time, ultimately saving money.
-
Precision: High-quality materials often allow for tighter tolerances in design, ensuring that the jig aligns perfectly with the miter saw. Accurate alignment is crucial for achieving the desired angles and fitting of crown molding.
-
Safety: A sturdy jig minimizes the risk of accidents. Quality materials contribute to a secure grip and stability, reducing the chances of slips or misalignments while cutting.
Selecting a jig made from high-quality materials is essential for ensuring effective performance and lasting results in any crown molding project.
How Do You Choose the Right Crown Molding Jig for Your Needs?
Choosing the right crown molding jig for your needs involves considering various factors that enhance accuracy and ease of use.
- Adjustability: A good crown molding jig should allow for precise adjustments to accommodate different angles and sizes of molding. This feature is crucial as it ensures that the cuts made on the miter saw match the specific angles required for proper installation, reducing the need for re-cuts and minimizing waste.
- Material Quality: The build quality of the jig significantly impacts its durability and performance. Jigs made from high-quality materials like aluminum or heavy-duty plastic tend to withstand the rigors of regular use without warping or breaking, providing consistent and reliable results over time.
- Ease of Setup: A jig that is quick and easy to set up can save valuable time, especially for larger projects. Look for features such as clear markings and simple clamping mechanisms that allow for fast adjustments and alignment with the miter saw.
- Compatibility: Ensure that the jig you choose is compatible with your miter saw model and the specific types of crown molding you plan to use. Some jigs are designed to work with various brands and sizes, while others may be more specialized, so checking compatibility helps prevent any issues during use.
- Portability: If you plan to use the jig in different locations or for various projects, portability becomes important. Lightweight designs with foldable features or carrying handles can enhance convenience, making it easier to transport and store when not in use.
- User Reviews: Reading user reviews and testimonials can provide insight into the performance of a crown molding jig. Feedback from other users can reveal strengths and weaknesses that might not be evident from product descriptions, helping you make a more informed decision.
What Steps Should You Follow to Set Up a Crown Molding Jig with Your Miter Saw?
To set up a crown molding jig with your miter saw, follow these essential steps:
- Gather Your Tools: Ensure you have all necessary tools including a miter saw, crown molding, the crown molding jig, clamps, and a measuring tape.
- Set the Miter Saw Angle: Adjust your miter saw to the correct angles for cuts, typically 31.6 degrees for flat cuts and 33.9 degrees for vertical cuts, depending on the crown molding profile.
- Position the Crown Molding: Place the crown molding into the jig, ensuring that it sits flat against the back and the bottom edge aligns correctly with the jig’s reference points.
- Secure the Molding: Use clamps to hold the crown molding securely in place within the jig, preventing any movement during the cutting process.
- Make the Cut: With everything in place, carefully make your cut, keeping your hands clear of the blade and following proper safety protocols.
- Test Fit and Adjust: After cutting, test fit the pieces in place; if adjustments are needed, make them gradually to ensure a tight fit.
Gather Your Tools: Before beginning, it’s essential to have all the necessary tools readily available. This includes a miter saw for precise cutting, the crown molding jig that will assist in holding the molding at the correct angle, clamps to secure the molding, and a measuring tape to ensure accurate dimensions.
Set the Miter Saw Angle: Crown molding typically requires angled cuts to achieve a seamless fit at corners. Most commonly, a miter saw is set to 31.6 degrees for flat cuts and 33.9 degrees for vertical cuts, which aligns with the standard dimensions of crown molding, making accurate angles crucial for a professional finish.
Position the Crown Molding: Proper placement of the crown molding in the jig is vital for achieving the right angle. The molding should rest flat against the back of the jig, with the bottom edge aligned with the reference points, ensuring that the cut will match the desired angle when installed.
Secure the Molding: To prevent any movement during the cutting process, use clamps to hold the crown molding tightly within the jig. This not only enhances safety but also ensures that the cut remains precise, reducing the likelihood of errors that can lead to misfitting pieces.
Make the Cut: With the molding secured and the saw angles set, it’s time to make the cut. Always keep your hands clear of the blade, use both hands to hold the saw, and follow all safety guidelines to ensure a clean and accurate cut.
Test Fit and Adjust: After cutting, it’s crucial to test fit the pieces in their designated locations. If there are any gaps or misalignments, make small adjustments to the cuts as necessary, ensuring that the final installation is seamless and professional-looking.
What Common Mistakes Should You Avoid When Using a Crown Molding Jig?
When using a crown molding jig, avoiding common mistakes can ensure better accuracy and a more professional finish.
- Incorrect Angle Settings: Many users fail to set the correct angle for cutting crown molding, which can lead to ill-fitting joints. Crown molding typically requires a compound miter cut, which combines bevel and miter angles; if these are set incorrectly, the pieces may not fit together seamlessly.
- Improper Jig Alignment: Misalignment of the jig with the miter saw can result in cuts that are not uniform or accurate. It is crucial to ensure that the jig is securely and correctly positioned on the saw to maintain consistent cutting angles throughout the project.
- Ignoring Material Thickness: Users sometimes overlook the thickness of the crown molding when adjusting the jig settings. Each type of molding may have different thicknesses that impact the angle calculations, leading to potential fitting issues when the pieces are assembled.
- Not Securing the Molding Properly: Failing to secure the crown molding properly in the jig can cause movement during cutting, which can ruin the precision of the cut. Using clamps or other mechanisms to hold the molding firmly in place is essential to achieving clean edges.
- Neglecting to Test Cuts: Skipping the step of making test cuts can lead to significant errors in the final pieces. Taking the time to perform test cuts on scrap pieces allows you to verify the settings and make adjustments before working on your actual molding.
- Rushing the Process: Many beginners rush through the setup and cutting process, which can lead to mistakes. Taking the time to carefully measure, set angles, and make cuts can greatly improve the quality of the finished work.
- Overlooking Safety Precautions: It’s easy to get caught up in the project and forget about safety measures. Always wear appropriate safety gear and ensure that the workspace is clear of hazards, as this will help prevent accidents while operating the miter saw and jig.
How Can a Crown Molding Jig Enhance Your Crown Molding Project Experience?
Safety: Using a jig can enhance safety by stabilizing the material during cutting, minimizing the risk of slips and accidents. A well-designed jig holds the molding securely in place, allowing for more controlled cuts and reducing the chances of injury from the saw.
Related Post: