For years, kitchen cabinet primers lacked the ability to combine primer, paint, and varnish in one easy step. That’s why I was excited to test the QUICKBOX® – All-In-One Paint for Durable Cabinet, Kitchen. Its water-based acrylic formula offers exceptional adhesion and coverage without needing an extra primer, saving time and effort. During my tests, I found it produces a smooth, silk matte finish that resists yellowing, cracking, and impacts. Plus, it’s highly resistant to household cleaners and moisture, making it perfect for busy kitchens. Second paragraph continuing the warm, accessible tone… I was impressed by how easily it applied with a brush or roller, and how well it adhered to different surfaces—no priming needed. The fact that it’s suitable both indoors and outdoors means it’s versatile, durable, and long-lasting. After comparing with other all-in-one paints, this product stood out for its built-in primer and top coat, providing a flawless finish and outstanding durability. Trust me, if you want a reliable, no-fuss solution, this is the way to go.
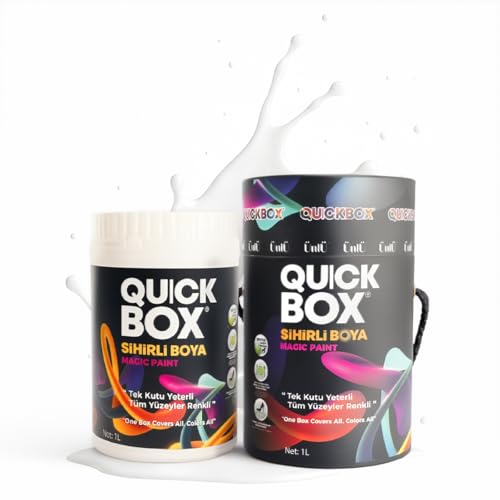
Top Recommendation: QUICKBOX® – All-In-One Paint for Durable Cabinet, Kitchen
Why We Recommend It: This product excels because it combines primer, paint, and topcoat in one formula, reducing steps and time. Its silk matte finish is resilient against cracks, yellowing, and impacts, ideal for high-use kitchen cabinetry. Unlike competitors, it boasts exceptional adhesion to multiple surfaces without priming, saving even more effort. Its water-based, low VOC composition ensures a safe, eco-friendly, and easy-to-clean application. Overall, it offers superior durability, coverage, and versatility for a professional-looking result.
Best kitchen cabinet primer: Our Top 3 Picks
- QUICKBOX® – All-In-One Paint for Durable Cabinet, Kitchen – Best Value
- DWIL Cabinet Paint All Match 32 OZ Black Waterproof Kit – Best Premium Option
- Vibrant Cabinet Paint Quart Black Night – Best for Vibrant Finish and Color Variety
QUICKBOX® – All-In-One Paint for Durable Cabinet, Kitchen
- ✓ Easy to apply
- ✓ No primer needed
- ✓ Durable, water-resistant finish
- ✕ Slightly pricey
- ✕ Limited color options
| Type | Water-based acrylic multi-surface paint with built-in primer and topcoat |
| Finish | Silk matte |
| Coverage | Exceptional coverage (exact coverage not specified) |
| Application Method | Brush or roller |
| Durability Features | Resistant to water, soap, household cleaners, scratches, impacts, peeling, blistering, and heat |
| Suitable Surfaces | Furniture, kitchen cabinets, bathroom fixtures, radiators, tiles, doors, and décor |
As I grabbed my paintbrush and stepped into the kitchen, I noticed my old, worn-out cabinet doors looked tired and dull. I decided to give them a fresh look, and the QUICKBOX® All-In-One Paint was sitting right on my shelf, ready to work its magic.
I was instantly impressed by how smooth and velvety the product felt as I dipped my brush in. It glided effortlessly onto the surface, covering in just a few quick strokes.
What really stood out was the paint’s rich coverage—no need for a separate primer, which saved me time and effort. Its water-based acrylic formula dried quickly and felt light, yet durable.
I loved that I didn’t have to worry about yellowing or cracking over time, thanks to its silk matte finish. The paint’s resistance to water, household cleaners, and scratches made me confident it’d withstand daily kitchen life.
Applying it was a breeze, whether with a brush or roller. The surface ended up smooth and even, with no streaks or brush marks.
Plus, cleanup was simple—just a soapy cloth, no fuss. I even used it on a bathroom cabinet without any issues, and it held up well against humidity.
Overall, this product transformed my cabinets into a sleek, modern look without the hassle of multiple coats or topcoats. It’s perfect for quick DIY upgrades that look professional.
DWIL Cabinet Paint All Match 32 OZ Black Waterproof Kit

- ✓ No sanding required
- ✓ Waterproof & moisture resistant
- ✓ Easy to use kit
- ✕ Limited color options
- ✕ Might need multiple coats
| Type | All-in-One Cabinet Paint, Primer, Finish, and Varnish |
| Volume | 32 ounces (946 ml) |
| Application Area | Suitable for kitchen and bathroom cabinets |
| Waterproof | Yes, moisture resistant |
| Odor Level | Low odor formulation |
| Ease of Use | No sanding required, beginner-friendly kit |
Finally, I got my hands on the DWIL Cabinet Paint All Match 32 OZ in black, and I’ve got to say, it’s been on my wishlist for a while. The moment I opened the kit, I was impressed by how user-friendly it looked—everything neatly packed, ready for a straightforward project.
This paint is a game-changer because it combines primer, finish, and varnish all in one. No more juggling multiple products or spending hours sanding down cabinets.
And guess what? You can skip the sanding entirely, which saves so much time and effort.
I applied it directly onto my old cabinets, and the smoothness of the finish was surprisingly professional-looking.
What really stood out is its waterproof and moisture-resistant feature. My kitchen gets pretty humid, especially during cooking, but the cabinets stayed looking fresh and vibrant.
Plus, the low odor made the whole process much more bearable—no overwhelming chemical smell while working indoors.
The kit includes all the tools I needed for a clean application, making it perfect for beginners or anyone who wants a quick upgrade. The black color coverage was even, and I didn’t need multiple coats to get the deep, rich finish I was after.
It dried quickly, and I was able to put everything back together in no time.
Overall, this product lives up to the promise of an easy, durable, and high-quality makeover. It’s affordable, effective, and makes the daunting task of cabinet painting feel like a breeze.
I’d definitely use it again for future projects.
Vibrant Cabinet Paint Quart Black Night

- ✓ Easy to apply
- ✓ Fast drying time
- ✓ Durable finish
- ✕ Limited to black color
- ✕ May require multiple coats
| Finish | Interior satin finish with fast dry time |
| Coverage | Up to 12 cabinet pieces per quart |
| Application Type | Brush and roller |
| Drying Time | Fast dry, typically within a few hours, project completion in as little as one day |
| VOC Content | Low VOC (Volatile Organic Compounds) |
| Material | Premium water-borne acrylic paint |
It’s a chilly Saturday afternoon when I decide to give my tired, outdated kitchen cabinets a fresh look. I grab a quart of Vibrant’s Black Night, and as I open the can, the rich, deep black color immediately catches my eye.
The smooth, creamy consistency makes me think this will be a breeze to work with.
Applying it is surprisingly effortless. The paint glides on smoothly with my brush, creating even coverage without any streaks or drips.
I love how quickly it dries—within a few hours, I can see that glossy, flawless finish taking shape. No long waiting times, so I can finish my entire project in just one day.
The durability of this paint really stands out. After a few days, I notice that it resists scratches and marks from everyday use, like accidental bumps or minor spills.
It remains flexible, so I don’t have to worry about cracking or peeling over time. Plus, the low VOC formula makes me feel good about using it around my family, knowing it’s eco-friendly and safe.
Transforming my cabinets from dull to sleek was more affordable than professional refinishing, and the coverage is impressive—just one quart covered all my kitchen cabinets comfortably. It’s perfect for high-traffic areas since it withstands household substances like oils and vinegar without staining or fading.
If you’re aiming for a modern, high-end look without the hefty price tag, this paint is a solid choice. It truly breathes new life into your space with minimal fuss and maximum style.
What Makes a Primer Essential for Kitchen Cabinets?
- Adhesion: A good primer enhances the bond between the cabinet surface and the topcoat, reducing the likelihood of peeling or chipping over time.
- Stain Blocking: Many primers are formulated to block stains, ensuring that any previous colors or marks do not bleed through the new paint, resulting in a cleaner and more uniform finish.
- Sealing Properties: A quality primer seals the wood or laminate surface, preventing moisture absorption which is crucial in a kitchen environment where humidity can fluctuate.
- Fast Drying: The best kitchen cabinet primers dry quickly, allowing for faster project completion without compromising the quality of the finish.
- Compatibility: It’s essential that the primer is compatible with the type of paint being used, whether it’s water-based or oil-based, to ensure optimal adhesion and performance.
- Sandability: High-quality primers can be sanded easily, allowing for a smoother finish when the topcoat is applied, which is particularly important for achieving a professional look.
How Does a Kitchen Cabinet Primer Help the Paint Adhere?
A kitchen cabinet primer enhances paint adhesion by preparing the surface for optimal bonding. The best kitchen cabinet primer offers several key benefits:
- Surface Preparation: Primers create a smooth and even surface for paint application, filling in small imperfections and ensuring that the paint adheres better.
- Sealing Properties: A good primer seals the porous surfaces of wood or previously painted cabinets, preventing the paint from soaking in and ensuring an even finish.
- Stain Blocker: Many primers are formulated to block stains and prevent them from bleeding through the topcoat, which is particularly important for kitchen cabinets that may encounter grease or moisture.
- Adhesion Promoter: Kitchen cabinet primers often contain additives that increase the bond between the primer and the paint, which helps prevent chipping and peeling over time.
- Quick Drying: The best kitchen cabinet primers are designed to dry quickly, allowing for faster project completion and ensuring that multiple coats can be applied in a shorter time frame.
What Preventive Measures Does Primer Offer Against Stains and Moisture?
Primer plays a crucial role in protecting kitchen cabinets from stains and moisture.
- Stain Blocking: Many primers are formulated with stain-blocking technology that prevents common kitchen stains, such as grease or food spills, from penetrating the wood surface. This feature is particularly beneficial in kitchens where spills are frequent, ensuring that the underlying wood remains intact and free from discoloration.
- Moisture Resistance: The best kitchen cabinet primers include moisture-resistant properties that form a barrier against humidity and water. This is essential in kitchen environments, where steam and spills can lead to warping or mold if the wood is not properly protected.
- Adhesion Improvement: High-quality primers improve the adhesion of topcoats, ensuring that the paint or finish applied afterward adheres better and lasts longer. This added durability helps maintain a beautiful finish even in the face of regular kitchen wear and tear.
- Mold and Mildew Prevention: Some primers contain antimicrobial agents that inhibit the growth of mold and mildew, which can flourish in damp kitchen conditions. This feature is especially important for maintaining a healthy kitchen environment and prolonging the life of the cabinetry.
- Easy Application: Many modern primers are designed for easy application, whether by brush, roller, or spray, allowing for a smoother finish that reduces the risk of imperfections. This convenience can save time and effort, making the painting process more efficient and effective.
What Are the Key Features of an Effective Kitchen Cabinet Primer?
The key features of an effective kitchen cabinet primer include:
- Adhesion: A good primer must adhere well to various surfaces, including wood, laminate, and previously painted cabinets, ensuring a strong bond that prevents peeling or chipping over time.
- Stain Blocking: Effective primers possess stain-blocking properties that prevent stains from bleeding through the topcoat, which is particularly important for kitchen cabinets that may be exposed to grease and food particles.
- Quick Drying Time: An ideal primer should dry quickly to allow for efficient project completion, enabling multiple coats to be applied in a single day, thus speeding up the overall painting process.
- Sandability: A primer that can be easily sanded creates a smooth surface for the topcoat, which enhances the final finish and improves the durability of the paint applied over it.
- Low VOCs: Choosing a primer with low volatile organic compounds (VOCs) ensures a safer working environment with less odor and fewer harmful emissions, making it a better option for indoor use, especially in kitchens.
- Compatibility: An effective kitchen cabinet primer should be compatible with both oil-based and water-based paints, providing versatility for homeowners and professionals who may choose different types of finishes.
Why Is Stain Blocking Power Important?
Stain blocking power is a critical characteristic of kitchen cabinet primers, especially when dealing with surfaces that may harbor stains or odors. Effective stain blocking is essential for achieving a smooth, uniform finish that withstands the test of time.
Here are key reasons why stain blocking is vital:
-
Prevents Bleed-Through: Certain woods or previously painted surfaces can have inherent colors or stains that bleed through the primer. A primer with strong stain blocking power prevents these issues, ensuring the topcoat looks consistent.
-
Odor Barrier: Materials like smoke-damaged cabinets or those exposed to kitchen odors can retain unpleasant smells. A high-quality primer can seal these odors, creating a fresh canvas for paint application.
-
Surface Restoration: Stain blocking primers can restore the appearance of weathered, discolored, or stained surfaces, making them look new again. This is particularly beneficial for cabinets that have aged or suffered from neglect.
-
Durability: Properly blocking stains contributes to the overall durability of the paint finish, prolonging the life of the cabinets and reducing maintenance needs.
Selecting a primer with excellent stain blocking properties is essential for achieving a professional-grade look in your kitchen cabinet project.
What Is the Difference Between Oil-Based and Water-Based Primers?
| Aspect | Oil-Based Primer | Water-Based Primer |
|---|---|---|
| Composition | Made with oil and solvents, providing a strong bond and stain blocking. | Made with water and acrylics, offering low odor and easy cleanup. |
| Drying Time | Longer drying time, usually 6-8 hours before recoating. | Quicker drying, often 1-2 hours before recoating. |
| Application | Can be more challenging to apply, requiring careful handling due to fumes. | Easy to apply with tools, suitable for indoor use due to low fumes. |
| Finish | Provides a smooth, durable finish ideal for high-traffic areas. | Offers a less durable finish but is flexible and resistant to yellowing. |
| Cost | Generally more expensive due to higher material costs. | Typically less expensive and more widely available. |
| Best Use Scenarios | Ideal for wood surfaces and areas prone to heavy staining. | Best for drywall, ceilings, and areas with low moisture. |
| Environmental Impact | Higher VOCs, can be harmful to the environment and health. | Low VOCs, more environmentally friendly and safer for indoor use. |
How Should You Properly Apply Kitchen Cabinet Primer?
Applying kitchen cabinet primer correctly is essential for achieving a smooth, durable finish. Follow these steps for proper application:
-
Preparation: Start by thoroughly cleaning the cabinet surfaces to remove grease, dirt, and previous finishes. Sand lightly to create a key surface for the primer to adhere to, using a medium grit sandpaper for best results. Wipe down with a damp cloth to remove dust.
-
Choosing the Right Tools: Use a high-quality brush or a foam roller for application. A brush is advantageous for corners and detailed areas, while a roller is effective for larger flat surfaces.
-
Application Technique:
– Begin by applying a thin coat of primer. Avoid overloading your brush or roller.
– Work in sections, applying the primer in smooth, even strokes. For best results, follow the wood grain if present.
– Be mindful of drips or runs and smooth them out immediately. -
Drying Time: Allow the primer to dry according to the manufacturer’s instructions—typically 1 to 2 hours. Ensure that it is completely dry before applying a second coat or paint.
-
Final Sanding: Once the primer is dry, lightly sand it again with fine-grit sandpaper to enhance the surface for paint adhesion.
By following these steps, you will set a solid foundation for a beautiful finish on your kitchen cabinets.
What Techniques Ensure a Smooth Finish?
To achieve a smooth finish when painting kitchen cabinets, several techniques and products are recommended:
- Proper Surface Preparation: Thoroughly clean, sand, and fill any imperfections on the cabinet surfaces before priming. This ensures better adhesion and a smoother final appearance.
- Using High-Quality Primer: Selecting the best kitchen cabinet primer is crucial as it promotes adhesion, prevents stains, and can help in achieving a smooth finish. Look for primers specifically designed for cabinetry that offer a smooth application and rapid drying time.
- Applying Thin Coats: Applying multiple thin coats of primer and paint rather than one thick coat helps to avoid drips and allows for smoother finishes. Thin layers dry faster and level out better, leading to a more even surface.
- Using a Foam Roller: A foam roller can provide a smoother finish compared to traditional brushes, as it minimizes brush strokes and creates an even layer of paint or primer. For tight spaces and corners, a high-quality brush can be used in tandem with the roller.
- Sand Between Coats: Lightly sanding between coats of primer and paint can help to eliminate imperfections and promote better adhesion of subsequent layers. Use a fine-grit sandpaper for this step to avoid damaging the surface.
- Using a Paint Sprayer: For the ultimate smooth finish, consider using a paint sprayer which can apply a fine mist of primer and paint evenly across surfaces. This technique minimizes brush strokes and can cover larger areas more efficiently.
- Allowing Adequate Drying Time: Ensuring that each coat of primer and paint is fully dried before applying the next one is vital. This prevents any issues with adhesion or finish quality and allows the surface to cure properly.
Should You Sand Before Applying Primer?
Additionally, sanding helps to ensure that any dust or debris is removed, which could otherwise interfere with the primer application. It also allows for better penetration of the primer into the surface, resulting in improved adhesion. For kitchen cabinets, which are subject to wear and tear, taking the time to sand properly can significantly extend the life of the paint job and improve the appearance of the final coat, making it a vital step in achieving the best results with your chosen kitchen cabinet primer.
How Can You Maintain the Longevity of Your Kitchen Cabinet Primer?
To maintain the longevity of your kitchen cabinet primer, consider the following practices:
- Proper Surface Preparation: Before applying primer, ensure that the cabinet surfaces are clean, dry, and free from grease or dust. This step is crucial as it allows the primer to adhere effectively, creating a strong bond that enhances durability.
- Choose High-Quality Primer: Selecting the best kitchen cabinet primer is vital for long-lasting results. High-quality primers are formulated to withstand wear and tear, provide better adhesion, and resist stains and moisture, making them ideal for kitchen environments.
- Apply in Optimal Conditions: The environment in which you apply the primer significantly impacts its performance. Ideally, primers should be applied in a temperature-controlled space with low humidity to ensure proper curing and adhesion, preventing issues like peeling or bubbling.
- Use Appropriate Tools: Utilizing the right tools for application can affect the finish and longevity of the primer. Brushes, rollers, or sprayers specifically designed for primer applications help achieve an even coat, reducing the likelihood of imperfections that can compromise durability.
- Follow Manufacturer Instructions: Always adhere to the instructions provided by the primer manufacturer regarding application and drying times. This ensures that the primer performs as intended and maximizes its effectiveness, leading to longer-lasting results.
- Regular Maintenance: To extend the life of your primed cabinets, implement a routine cleaning schedule that avoids harsh chemicals. Gentle cleaning solutions and soft cloths can help maintain the primer’s integrity without causing damage.
What Post-Application Care Is Necessary?
Post-application care is essential to ensure the best results after using the best kitchen cabinet primer.
- Drying Time: It’s crucial to allow the primer to dry completely according to the manufacturer’s instructions. This ensures that the primer adheres properly to the surface and prevents any lifting or peeling when additional coats are applied or when the cabinets are put to use.
- Cleaning Tools: After the application, clean any brushes or rollers used with soap and water if the primer is water-based, or with solvent for oil-based primers. This helps maintain the tools for future projects and ensures that no leftover primer affects the quality of future paint jobs.
- Inspecting the Surface: Once the primer is dry, inspect the surface for any imperfections or areas that may need another coat. Addressing these issues before applying the topcoat can enhance the final finish and longevity of the paint.
- Ventilation: Maintain good ventilation in the area where the primer was applied. This helps to dissipate any lingering fumes and aids in the curing process, which is particularly important for oil-based primers.
- Waiting Period for Topcoat: Follow the recommended waiting period before applying the topcoat. This is essential as it allows the primer to bond effectively and ensures that the topcoat adheres well without any issues.