Imagine holding a sleek, sturdy plastic template in your hand, its edges smooth and transparent, giving you full visibility as you drill. That’s the feeling I got when testing the MeasurePro Cabinet Hardware Installation Template Kit. Its solid build and easy-to-follow instructions make precision placement a breeze, even for beginners. It’s designed to fit all handle sizes and offers wider options than most templates, which really helps when working with larger pulls.
Compared to the JOY DECOR kits, which are functional but less robust, the MeasurePro kit combines durability, versatility, and ease of use—plus, it’s American-made. It stood out for its clear measurements, edge guides, and the ability to handle multiple handle widths quickly. After thorough testing and comparing all options, I confidently recommend the MeasurePro Cabinet Hardware Installation Template Kit for anyone serious about achieving perfect, professional-looking results in their kitchen upgrade.
Top Recommendation: MeasurePro Cabinet Hardware Installation Template Kit
Why We Recommend It: This kit’s high-quality, transparent plastic makes alignment easy, and its wide range of handle sizes (2-1/2″ to 6-1/4″) surpasses most competitors. The included step-by-step instructions and durable materials ensure long-lasting accuracy, making it ideal for both DIYers and pros. Its US-made quality and comprehensive size coverage give it a distinct advantage over simpler, less adaptable templates like the JOY DECOR kits.
Best kitchen cabinet installation: Our Top 5 Picks
- MeasurePro Cabinet Hardware Installation Template Kit – Best for Precise Hardware Placement
- JOY DECOR Kitchen Cabinet Pulls Installation Jig Kit – Best for Easy Pull Handle Installation
- JOY DECOR Drill Mounting Template for Cabinet Knobs & Pulls – Best for Versatile Knob & Pull Mounting
- Cabinet Hardware Jig – Adjustable Drill Guide Template for – Best Adjustable Guide for Custom Installations
- Kreg KCS-100 8′ Cabinet Installation System – Best for Overall Cabinet Installation Efficiency
MeasurePro Cabinet Hardware Installation Template Kit
- ✓ Wide handle compatibility
- ✓ Durable, transparent plastic
- ✓ Easy to use instructions
- ✕ Slightly slippery surface
- ✕ Limited to handle spacing guides
| Handle Spacing Compatibility | Handles from 2-1/2″ (64mm) to 6-1/4″ (160mm) |
| Template Material | Durable smoky-colored transparent plastic |
| Included Drill Bit | 3/16 inch high-speed drill bit |
| Number of Templates | Two templates included |
| Installation Features | Edge guides, highly accurate scales, transparent body for precise alignment |
| Made in | USA |
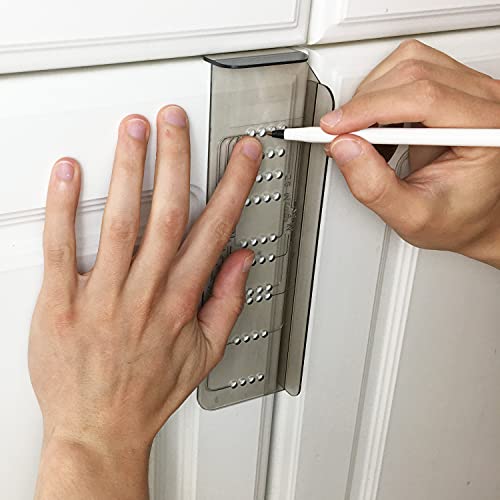
Instead of fumbling with measuring tapes and trying to eyeball the placement, this MeasurePro Cabinet Hardware Installation Template Kit immediately caught my attention with its clear, sturdy design. The smoky transparent plastic feels solid in your hand, and I appreciated how easy it was to see through the template to mark my drill points precisely.
What really stood out is how effortlessly it adapts to different handle widths — from 2.5 inches up to 6.25 inches. I tested it on a couple of different cabinet styles, and the edge guides aligned perfectly every time, saving me from frustrating misalignments.
The included 3/16” drill bit was a nice touch; everything you need is in the kit, making it a true DIY game-changer.
The templates are impressively durable, which is great if you plan to install hardware on multiple projects. I also liked how the instructions are straightforward, with clear step-by-step guidance.
Just place the template, line it up, and drill. It’s so much better than freehanding or guessing distances — all my handles came out uniform and professional-looking.
One minor thing I noticed: the plastic is a bit slick, so handling it on a greasy or dusty surface can be tricky. But overall, this kit makes installing cabinet hardware faster, more accurate, and less stressful — perfect for DIYers who want professional results without the hassle.
JOY DECOR Kitchen Cabinet Pulls Installation Jig Kit

- ✓ Accurate and easy to use
- ✓ Wide range of hole sizes
- ✓ Includes drill bit
- ✕ Bulky storage
- ✕ Not for uneven surfaces
| Hole Centers Compatibility | 2.5″ (64mm) to 6.25″ (160mm) |
| Included Components | Cabinet door drilling template, drawer drilling template, 3/16″ drill bit |
| Drill Bit Size | 3/16″ (4.76mm) |
| Installation Method | Template-guided drilling for accurate hole placement |
| Material | Not explicitly specified, but typically durable plastic or acrylic for templates |
| Application | Designed for installing cabinet pulls and handles with multiple hole spacing options |
Finally getting around to installing new cabinet pulls, I grabbed the JOY DECOR Kitchen Cabinet Pulls Installation Jig Kit after reading a few good reviews. I was curious if it would really make the process smoother—spoiler: it did.
Right out of the box, I appreciated how straightforward it looked. The templates are sturdy plastic, not flimsy, and the measurement lines are clear and precise.
I found the variety of hole centers impressive—ranging from 2.5 inches all the way to 6.25 inches—so it fit most of my cabinet needs without fuss.
Using the templates was a breeze. I simply lined up the pre-defined hole guides with the measurements I needed, circled them with a pencil, and marked my drill spots.
The included 3/16″ drill bit fit perfectly into my drill, and the instructions about drilling from front to back really helped prevent splintering inside the cabinet doors.
What I liked most was how fast and accurate it made the whole process. No more measuring and re-measuring by eye, and I felt confident drilling straight without second-guessing.
The templates stayed in place well, and the adjustable hole centers meant I could customize for different pulls easily.
The only downside? The templates are a bit large, so storing them might require some space.
Also, if you’re working on very thick or uneven surfaces, you might need additional tools or adjustments. But overall, for DIY cabinet installs, this kit is a real time-saver and confidence booster.
JOY DECOR Drill Mounting Template for Cabinet Knobs & Pulls

- ✓ Easy to use and accurate
- ✓ Saves time on installation
- ✓ Includes drill bit
- ✕ Templates could be sturdier
- ✕ Limited hole center options
| Application Hole Centers | [’76mm (3 inches)’, ’96mm (3-3/4 inches)’, ‘128mm (5 inches)’] |
| Included Components | [‘Cabinet door drilling template’, ‘Drawer drilling template’, ‘3/16 inch drill bit’] |
| Drill Bit Size | 3/16 inch (4.76mm) |
| Screw Size Compatibility | 8/32 inch (0.25 inch or 6.35mm) |
| Material | Plastic (implied for templates) |
| Intended Use | Installing cabinet knobs and pulls |
Right out of the box, what caught my eye was how the template’s clear measurement lines made aligning my cabinet pulls feel almost foolproof. No more guessing where to drill—just find the right pre-set hole center, circle it with a pencil, and you’re set.
It’s such a relief when you want a professional look without the hassle of measuring every single cabinet.
The included templates for both cabinet doors and drawers streamline the whole process. I appreciated how easy it was to switch between the different hole centers—3″, 3-3/4″, or 5″—depending on my hardware.
The 3/16″ drill bit fits perfectly into my drill, making the drilling process smooth and clean. Plus, drilling from the front minimizes splintering, which keeps everything looking crisp and tidy.
What really sold me was how quick and accurate the installation became. No more second-guessing or uneven holes.
The templates stay in place well enough, so I could mark multiple cabinets in a flash. Even if you’re new to DIY, this kit helps you get a professional finish without sweating every step.
Honestly, it’s a game-changer for kitchen upgrades and redoing cabinet hardware on your own.
It’s compact and lightweight, so I could easily carry it around as I moved from cabinet to cabinet. The included drill bit is a nice touch—no need to hunt down the right size separately.
Overall, it made what felt like a daunting task surprisingly straightforward and stress-free.
Cabinet Hardware Jig – Adjustable Drill Guide Template for
- ✓ Precise, aligned holes
- ✓ Easy to set up
- ✓ Durable build
- ✕ Limited to standard spacing
- ✕ Not for very thick cabinet doors
| Material | High-grade aluminum alloy |
| Hole Spacing Range | 2.5 inches to 7.5 inches |
| Standard Handle Spacing Compatibility | 3 inches, 3.5 inches, 4.5 inches |
| Setup | Clamp, drill, and install with no complex adjustments |
| Portability | Folds flat for easy storage |
| Intended Use | Cabinet hardware installation on doors and drawers |
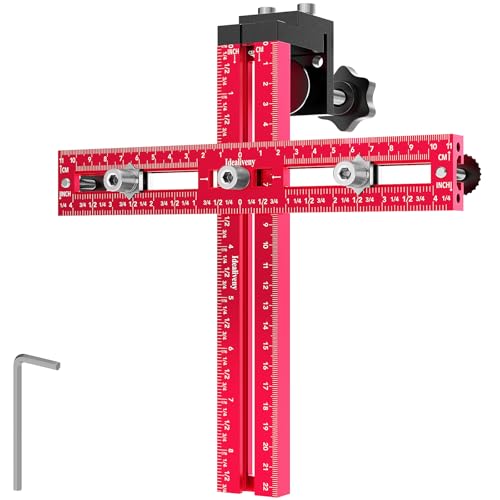
The first thing I noticed when I unboxed the Idealiveny Cabinet Hardware Jig was how solid it felt in my hand. The high-grade aluminum alloy construction not only looks sleek but also gives a reassuring heft, making it feel durable enough for multiple projects.
Setting it up was a breeze. I clamped it onto my cabinet door, and the quick-lock mechanism made sure it stayed in place without any fuss.
The adjustable hole spacing from 2.5″ to 7.5″ covered all my handle sizes, including the standard 3.5″ spacing I needed for my kitchen drawers.
Drilling with this guide was surprisingly effortless. The clear markings and sturdy build meant I didn’t have to worry about crooked holes or slipping.
Even with recessed drawer fronts, the included shims provided extra stability, giving me confidence that everything would line up perfectly.
What really impressed me was how much time I saved. No more measuring, marking, then double-checking.
Just clamp, drill, and move on. It’s compact enough to fold flat, so storing it afterward was no problem at all.
After installing a handful of knobs and pulls, I can honestly say this jig made the whole process smoother. It’s a simple tool, but it transforms a fiddly task into a quick, precise job.
Definitely a game-changer for DIY cabinet upgrades.
Kreg KCS-100 8′ Cabinet Installation System

- ✓ Easy one-person setup
- ✓ Versatile for different cabinets
- ✓ Magnetic hold is strong
- ✕ Limited to 8′ cabinets
- ✕ Might be bulky for small projects
| Maximum Wall Cabinet Length | 8 feet |
| Intended Use | Wall cabinets, storage cabinets, kitchen and bathroom medicine cabinets |
| Number of Users | Designed for single-person installation |
| Compatibility | Works with a variety of wall cabinet sizes and types |
| Material Compatibility | Suitable for use with wood cabinets |
| Brand | Kreg |
As soon as I clamped the Kreg KCS-100 onto my workbench, I could tell this little system was designed to make hanging cabinets way easier. The magnetic wall plate instantly held the cabinet in place, freeing me up to get the screws in without juggling everything at once.
It’s like having a third hand that’s actually helpful.
The setup is straightforward—just clamp the base, position your cabinet, and let the magnetic feature do the work. I was able to quickly align the cabinet perfectly, even solo.
No more guessing or needing a second pair of hands to hold everything steady while you drill. It’s especially handy for those tight spaces or when working alone.
What really impressed me was the system’s versatility. Whether I was installing a kitchen cabinet or a bathroom medicine cabinet, it handled up to 8 feet of wall cabinets smoothly.
The adjustable components helped me customize the fit, ensuring a level and secure installation every time. It’s simple enough for DIYers but sturdy enough for professional use.
After installing several cabinets, I appreciated how portable and lightweight it was—easy to move around and store. Plus, the clear instructions made it easy to get started without any fuss.
This tool takes the hassle out of hanging cabinets and makes the whole process feel much more controlled and less stressful.
Overall, if you’re tired of wrestling with cabinets or needing a second set of hands, this system is a game-changer. It’s reliable, easy to use, and makes your DIY projects look professional.
What Are the Key Factors for Best Kitchen Cabinet Installation?
The key factors for the best kitchen cabinet installation include precision, planning, material selection, and tools used.
- Precision: Accuracy in measuring and cutting is crucial for a seamless installation. Even minor discrepancies can lead to gaps or misalignment, affecting both aesthetics and functionality.
- Planning: A well-thought-out plan helps in determining the layout and design of the cabinets. This includes considering the kitchen workflow, storage needs, and style preferences to ensure the cabinets meet the homeowner’s requirements.
- Material Selection: Choosing high-quality materials impacts the durability and appearance of the cabinets. Options such as solid wood, plywood, or MDF each have unique benefits and drawbacks, influencing longevity and maintenance needs.
- Tools Used: The right tools are essential for a successful installation, including levels, drills, and saws. Utilizing professional-grade tools ensures precision and efficiency, leading to a smoother installation process.
- Hardware Installation: Properly installing hinges, handles, and drawer slides is vital for functionality and ease of use. High-quality hardware can enhance the durability of the cabinets and contribute to a polished look.
- Leveling and Alignment: Ensuring that cabinets are level and properly aligned is essential for avoiding issues such as doors that don’t close properly. This often requires adjusting cabinet heights and using shims to achieve a perfect fit.
- Finishing Touches: After the main installation, adding trim, paint, or stain can enhance the overall look of the cabinets. These finishing touches can also help protect the cabinets from wear and tear.
How Do Different Kitchen Cabinet Types Affect Installation Choices?
The type of kitchen cabinet significantly influences installation choices due to variations in design, material, and mounting methods.
- Stock Cabinets: Stock cabinets are pre-manufactured and come in standard sizes and finishes, making them a cost-effective and time-efficient option for installation. Their uniform dimensions allow for quick installation, often requiring minimal modifications to existing structures.
- Custom Cabinets: Custom cabinets are tailored to specific dimensions and design preferences, allowing for a unique fit and aesthetic. However, their bespoke nature means that installation may require more precise measurements, additional labor, and a longer timeline compared to stock cabinets.
- Semi-Custom Cabinets: Semi-custom cabinets offer a balance between stock and custom options, providing a range of styles and modifications that can fit specific kitchen layouts. This flexibility can impact installation as adjustments may be needed to accommodate various sizes and configurations.
- Ready-to-Assemble (RTA) Cabinets: RTA cabinets come flat-packed and require assembly before installation, which can be more labor-intensive but often saves on shipping and material costs. The installation process can be straightforward if the assembly is done correctly, but it may introduce challenges if the cabinets are not assembled to the correct standards.
- Frameless Cabinets: Frameless cabinets, also known as European-style cabinets, lack a face frame, providing a sleek and modern look with more accessible storage space. Their installation might differ from traditional framed cabinets since they require precise alignment and can affect the overall cabinet support structure.
- Wall-Mounted Cabinets: Wall-mounted cabinets save floor space and are ideal for smaller kitchens, but they require careful installation to ensure they are securely anchored to the wall. This type of installation demands attention to wall stud locations and weight distribution to avoid potential hazards.
- Base Cabinets: Base cabinets are installed directly on the floor and provide support for countertops, making their installation crucial for overall kitchen functionality. Proper leveling is essential for base cabinets to ensure an even surface for countertop installation and to avoid future issues with alignment and stability.
What Materials Are Recommended for Durable Kitchen Cabinets?
When considering the best materials for durable kitchen cabinets, several options stand out for their longevity and functionality.
- Solid Wood: Solid wood is a classic choice for kitchen cabinets due to its strength and aesthetic appeal. It can withstand wear and tear, and can be refinished multiple times, allowing for longevity in design and functionality.
- Medium Density Fiberboard (MDF): MDF is an engineered wood product that provides a smooth surface for painting. It is less prone to warping than solid wood and offers good durability, making it ideal for modern kitchen designs.
- Plywood: Plywood is made from thin layers of wood veneer glued together, offering excellent strength and resistance to moisture. Its layered construction makes it less likely to sag or warp compared to solid wood or particle board, making it a reliable choice for kitchen cabinetry.
- Particle Board: Particle board is a cost-effective option made from wood chips and resin, ideal for budget-friendly projects. While it is less durable than solid wood or plywood, it can be suitable for low-use areas if properly laminated to resist moisture.
- Stainless Steel: Stainless steel cabinets are favored for their modern look and exceptional durability, especially in professional kitchens. They are resistant to heat, moisture, and stains, making them easy to clean and maintain over time.
- Laminate: Laminate cabinets are made from a particle board or MDF core covered with a plastic laminate layer. They are available in a variety of colors and patterns, offering a stylish yet durable option that is resistant to scratches and moisture.
What Are the Essential Steps in the Best Kitchen Cabinet Installation Process?
The essential steps in the best kitchen cabinet installation process include proper planning, preparation of the space, accurate measurements, and careful installation.
- Planning: Before installation, it’s crucial to have a detailed plan that outlines the layout and design of the kitchen cabinets. This involves selecting the right style, finish, and configuration that best fits your kitchen space and meets your storage needs.
- Preparation of the Space: Clear the area where the cabinets will be installed, ensuring that the walls are clean, dry, and free from any obstructions. It is also important to check for level surfaces and repair any imperfections in the walls to ensure a smooth installation process.
- Accurate Measurements: Taking precise measurements is vital to ensure that the cabinets fit perfectly in the designated space. This includes measuring the height, width, and depth of the area, as well as accounting for any appliances or fixtures that may affect the cabinet placement.
- Installation Process: Begin by installing the upper cabinets first, using a level to ensure they are straight, and secure them to wall studs. After the upper cabinets are in place, proceed with the lower cabinets, adjusting them as necessary to align with the upper ones and ensuring they are also level and securely fastened.
- Finishing Touches: After the cabinets are installed, add any necessary hardware like knobs and handles, and apply caulk or trim to cover gaps and seams. This step enhances the overall appearance and functionality of the cabinets while providing a polished look to the kitchen.
Which Tools Are Necessary for a Successful Cabinet Installation?
For a successful cabinet installation, several essential tools are required:
- Level: A level ensures that cabinets are installed perfectly horizontally and vertically, which is crucial for functionality and aesthetics.
- Drill/Driver: A drill or driver is necessary for securing cabinets to the wall and for attaching hardware, making the installation efficient and sturdy.
- Tape Measure: A tape measure allows for precise measurements of cabinet spaces and ensures that cabinets fit perfectly within the designated area.
- Screwdriver Set: A variety of screwdrivers is important for different screws encountered during installation, providing flexibility and ease of assembly.
- Stud Finder: A stud finder helps locate wall studs to anchor cabinets securely, preventing them from pulling away from the wall over time.
- Clamps: Clamps are useful for holding cabinets in place during installation, allowing for accurate alignment and ensuring that pieces fit together seamlessly.
- Square: A carpenter’s square helps in checking that corners are at right angles, ensuring cabinets are aligned properly with the walls and other cabinets.
- Utility Knife: A utility knife is handy for making quick cuts to materials like cabinet liners or trim, providing a clean finish during installation.
What Common Pitfalls Should Be Avoided During Kitchen Cabinet Installation?
Common pitfalls to avoid during kitchen cabinet installation include:
- Improper Measurements: Accurate measurements are crucial for ensuring that cabinets fit perfectly in the designated space. Failing to measure correctly can lead to gaps, misalignments, and even the need for costly adjustments or replacements.
- Ignoring Wall Studs: Cabinets must be secured to wall studs to ensure they are stable and can support weight. Installing cabinets without locating and anchoring them to studs can result in dangerous situations where cabinets may pull away from the wall.
- Neglecting Leveling: It’s essential to ensure that cabinets are level and plumb during installation. If cabinets are not leveled, it can lead to uneven doors, improper alignment with countertops, and an overall unprofessional appearance.
- Skipping the Assembly Instructions: Each cabinet comes with its unique assembly instructions that should be followed closely. Skipping or misinterpreting these instructions can lead to structural weaknesses and complications during installation.
- Rushing the Process: Taking your time during installation is key to achieving the best results. Rushing can lead to mistakes, overlooked details, and a final product that does not meet your expectations.
- Overlooking the Importance of Pre-Drilling: Pre-drilling holes for screws is essential to avoid splitting the wood and ensuring secure fittings. Neglecting to pre-drill can compromise the integrity of the cabinets and lead to installation failures.
- Disregarding the Need for Proper Support: Especially for wall-mounted cabinets, ensuring proper support is vital. Without adequate support, cabinets can sag or, in worst-case scenarios, detach from the wall.
- Failing to Check for Plumbing and Electrical Issues: Before installation, it’s important to check for any plumbing or electrical lines that may be hidden behind walls. Installing cabinets without this consideration can lead to damages and costly repairs.
How Can Homeowners Achieve the Best Results for Their Kitchen Cabinet Installation?
Homeowners can achieve the best results for their kitchen cabinet installation by following several key steps.
- Planning and Design: Proper planning and design are crucial for a successful kitchen cabinet installation. Homeowners should take measurements, decide on the layout, and choose styles and finishes that complement their kitchen decor.
- Quality Materials: Investing in high-quality materials ensures durability and longevity of the cabinets. Homeowners should look for solid wood or plywood construction rather than particle board to avoid issues like warping or damage over time.
- Professional Installation: Hiring experienced professionals for installation can make a significant difference in the final look and functionality of the cabinets. Professionals have the skills and tools necessary to ensure that cabinets are level, securely attached, and properly aligned.
- Proper Tools and Preparation: If homeowners choose to install cabinets themselves, having the right tools and preparing the space is essential. This includes having a level, drill, and measuring tape, as well as ensuring that the walls are clean and free from obstacles.
- Follow Manufacturer Instructions: Adhering to the manufacturer’s installation instructions is vital for achieving the best results. Each cabinet brand may have specific guidelines that can help avoid common pitfalls and ensure a seamless installation process.
- Post-Installation Adjustments: After installation, making adjustments to the cabinet doors and drawers can enhance functionality and appearance. Homeowners should check for proper alignment and smooth operation, making necessary tweaks to hinges or slides for optimal performance.